What hashcat is and what it can do
hashcat is a password cracking tool written in C. It is designed for offline attacks against many different hash formats and is widely known for its speed and hardware acceleration. Depending on the system, it can use CPUs, GPUs, DSPs, and other supported devices to accelerate cracking tasks.
One limitation is important to keep in mind: hashcat is an offline cracking tool. It does not crack live online logins.
As of November 2024, the latest stable release is v6.2.6, and the last update was in September 2022.
Useful project pages:
- Official site: https://hashcat.net
- Open-source repository: https://github.com/hashcat/hashcat
- Beta builds: https://hashcat.net/beta/
- Kali package page: https://www.kali.org/tools/hashcat/
Installing hashcat
Linux
RHEL/CentOS
<table> <thead> <tr> <th>1 2 3 4 5 6</th>
<th>wget https://hashcat.net/files/hashcat-6.2.6.7z # 下载hashcat预编译二进制版本 yum install -y epel-release # 安装epel源 yum install p7zip # 从epel源安装p7zip 7za x hashcat-6.2.6.7z # 解压hashcat cd hashcat-6.2.6 ./hashcat.bin -V # 检查版本</th>
</tr>
</thead>
<tbody>
<tr>
<td></td>
<td></td>
</tr>
</tbody>
</table>
If p7zip installs very slowly, switching to a different EPEL mirror may help.
Debian/Ubuntu
<table> <thead> <tr> <th>1 2</th>
<th>apt install -y hashcat # 安装hashcat hashcat -V # 检查版本</th>
</tr>
</thead>
<tbody>
<tr>
<td></td>
<td></td>
</tr>
</tbody>
</table>
Installing hashcat through apt may also pull in nearly 1 GB of dependencies, including drivers. If the install is unusually slow, changing package mirrors can make a big difference.
Windows
Download the Windows build, extract it, and run hashcat.exe from a terminal:
https://hashcat.net/files/hashcat-6.2.6.7z

Driver support
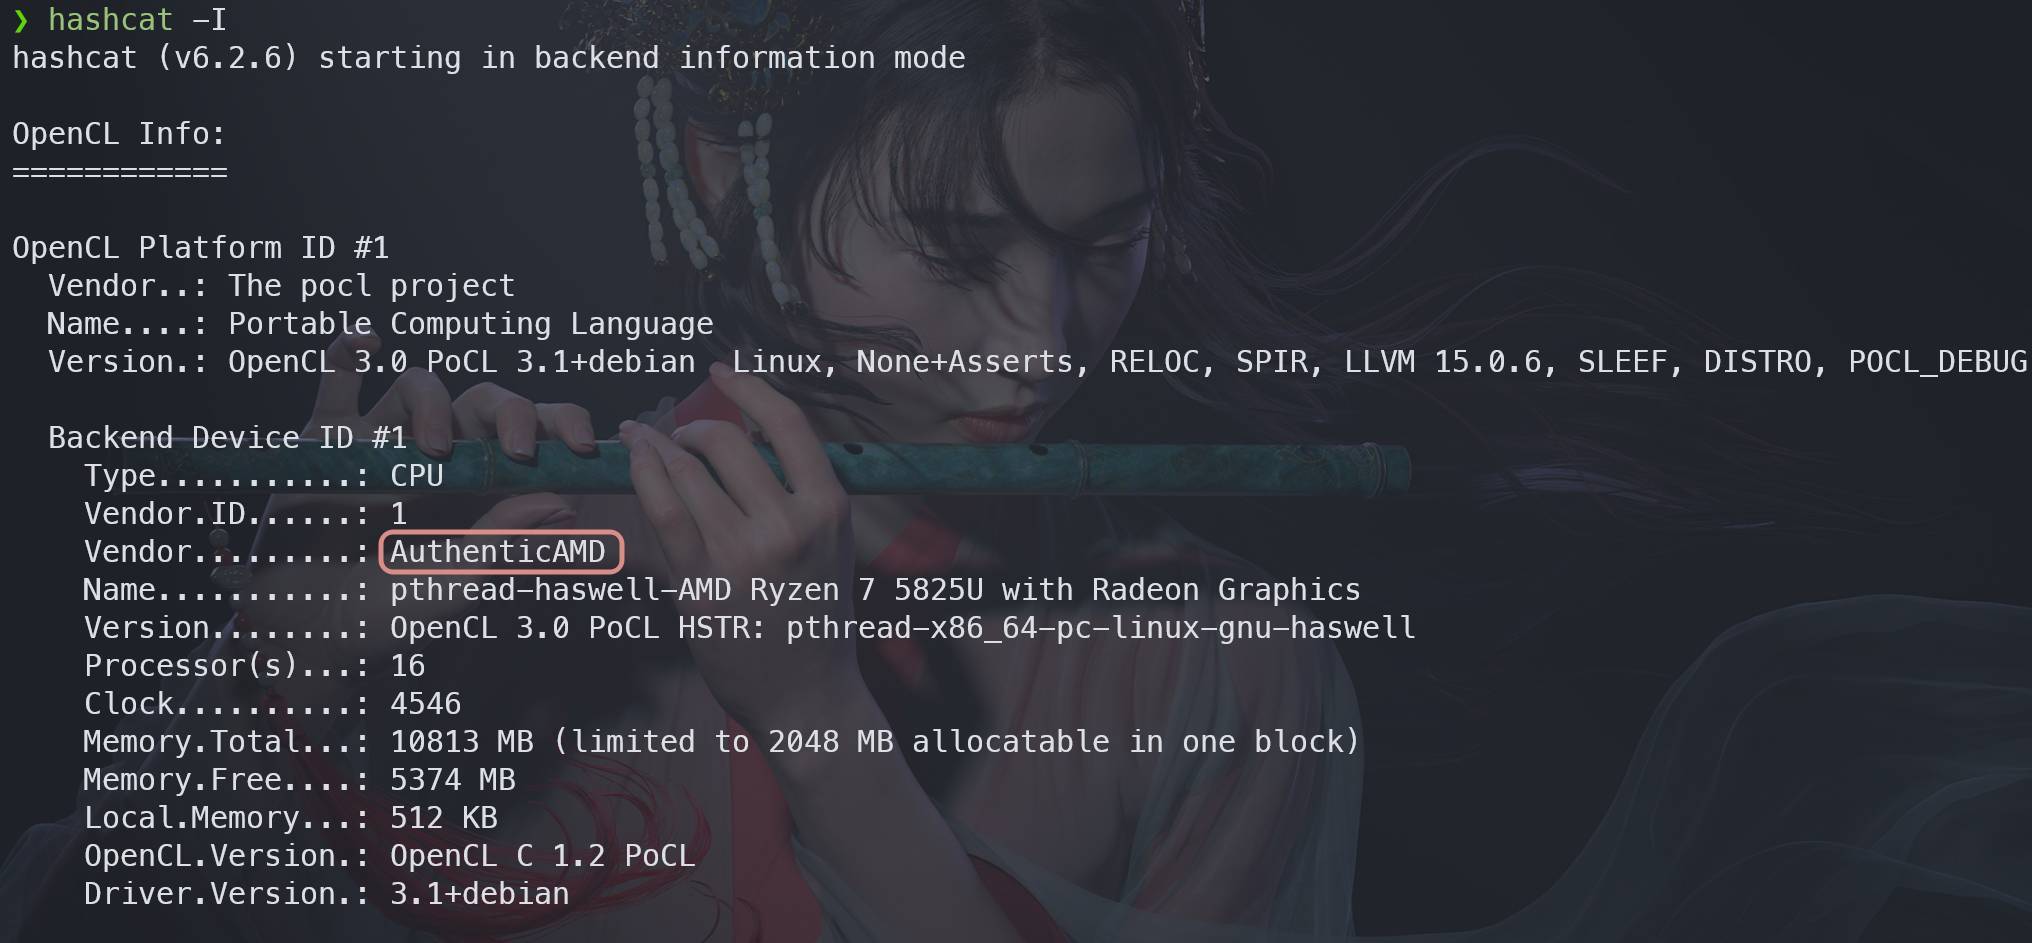
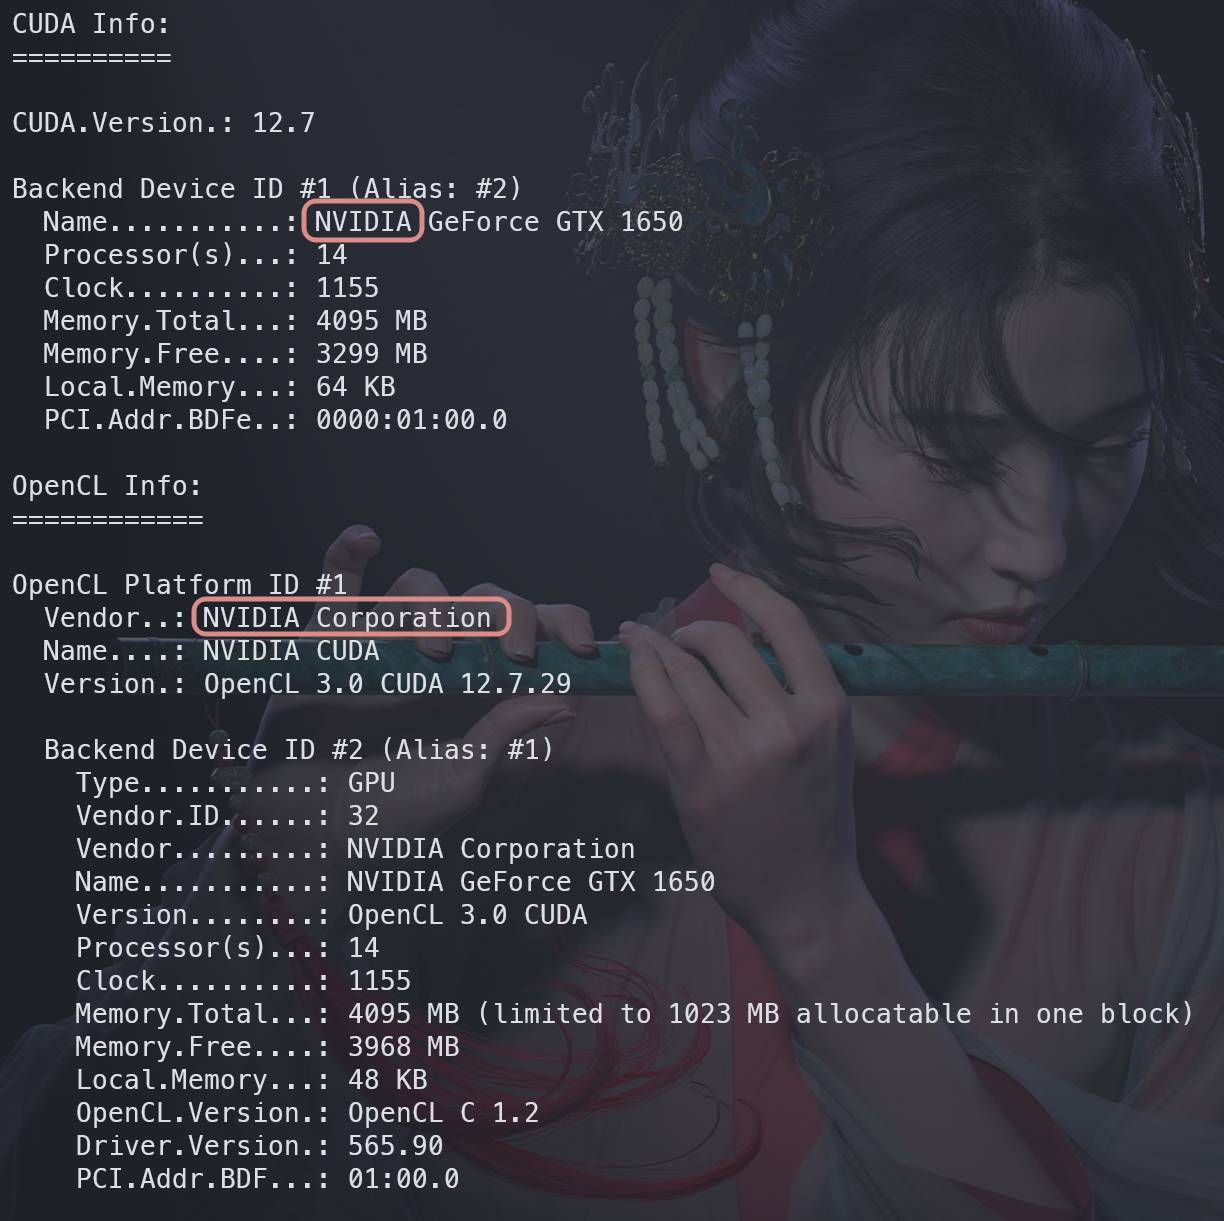
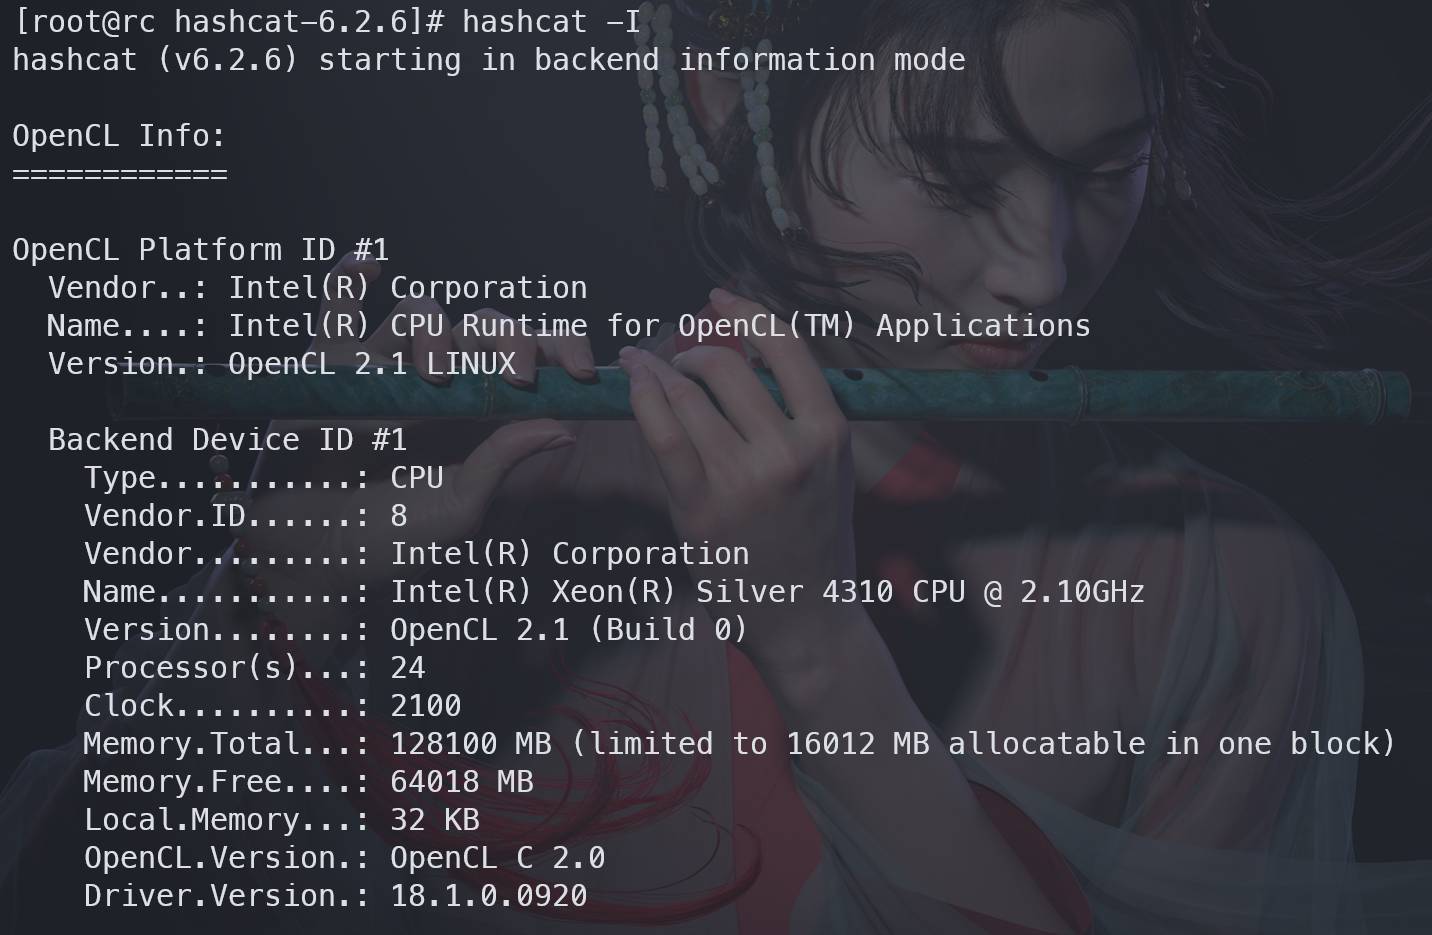
After installation, use -I or --backend-info to see what backends and devices hashcat can use:
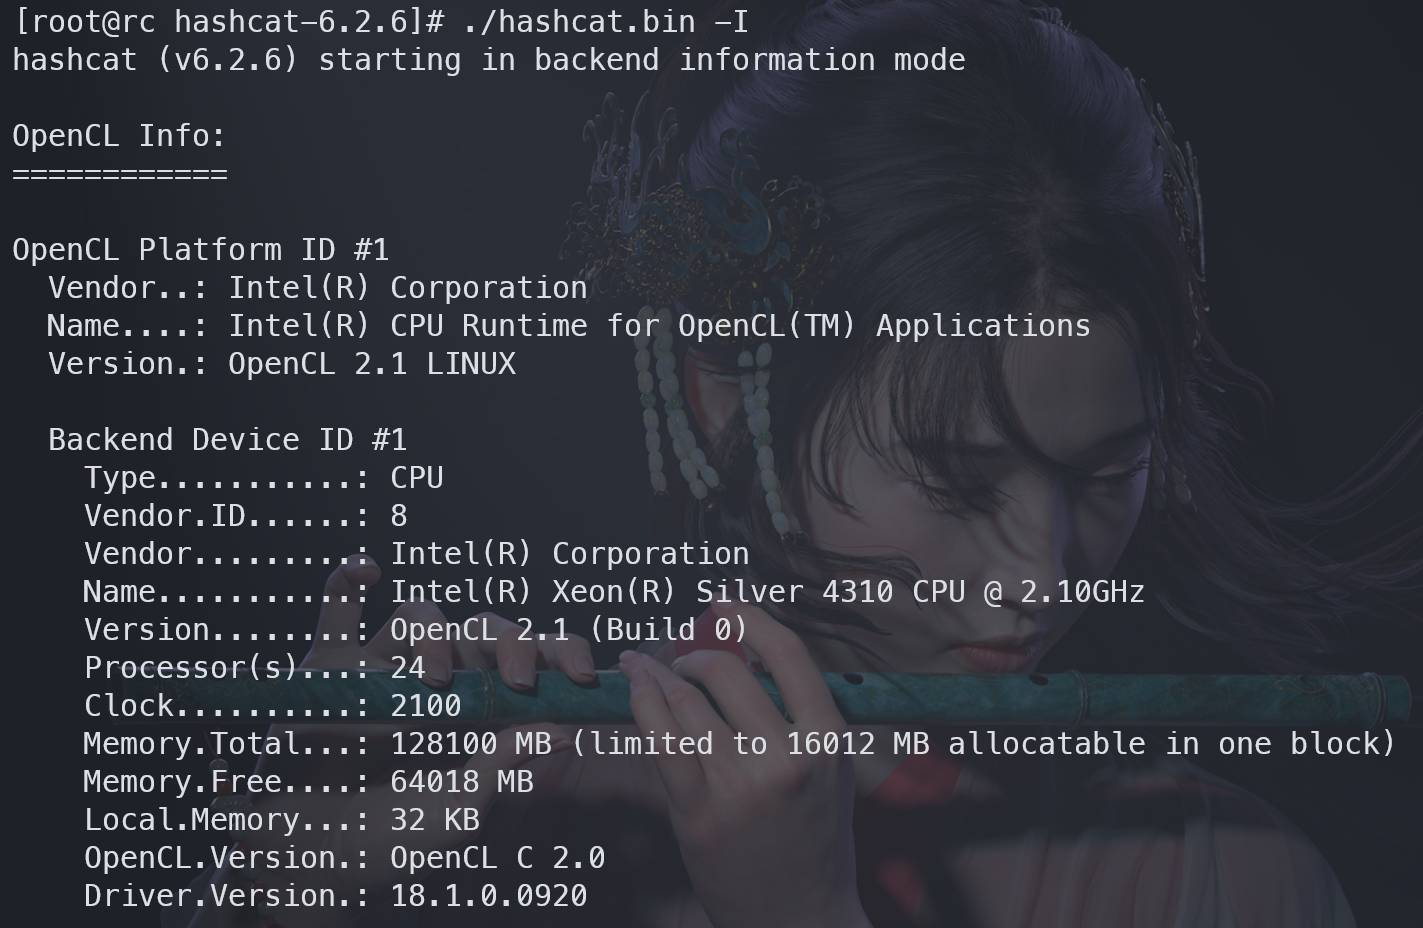
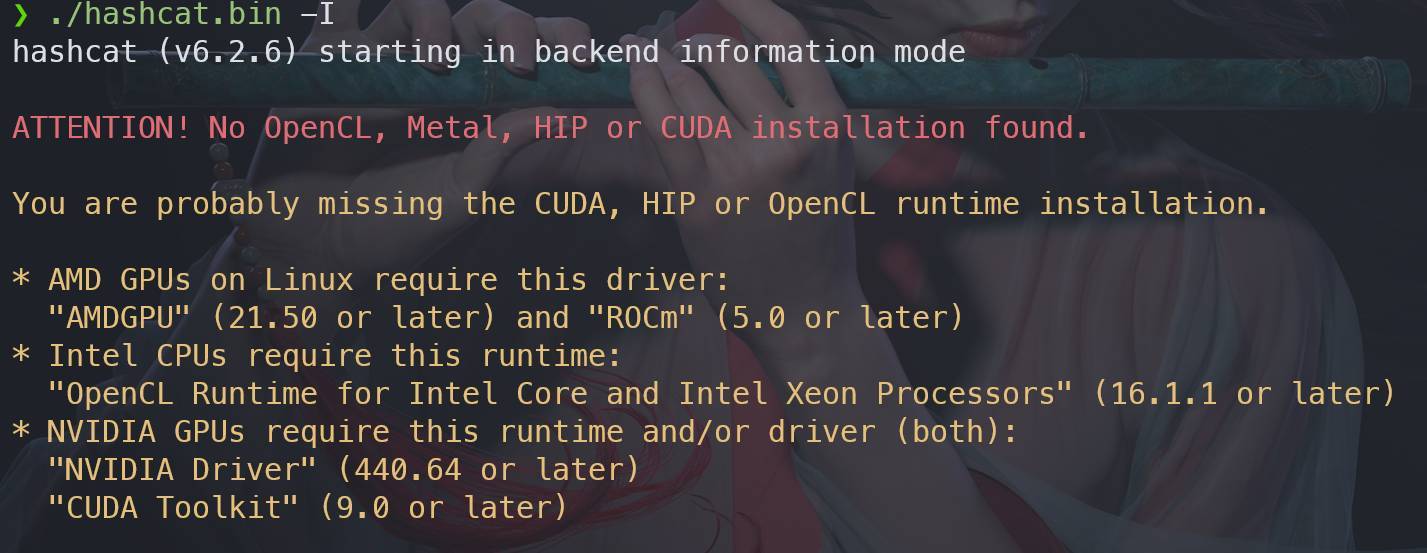
On Linux, repository packages usually install the required driver dependencies automatically. If you use the archive downloaded from the official site, you often need to install GPU/OpenCL drivers yourself. When the drivers are missing, hashcat output looks like this:
Intel
On RHEL/CentOS-style systems, Intel OpenCL drivers can be installed like this:
<table> <thead> <tr> <th>1 2 3 4 5</th>
<th>wget https://registrationcenter-download.intel.com/akdlm/irc_nas/vcp/15532/l_opencl_p_18.1.0.015.tgz # 下载驱动包 tar -xvf l_opencl_p_18.1.0.015.tgz # 解压驱动包 cd l_opencl_p_18.1.0.015 # 进入驱动包目录 ./install # 安装驱动,安装过程中会有各种确认,按照提示操作即可 ./hashcat.bin -I # 驱动安装完成后无需重启,直接调用hashcat -I即可看到驱动信息</th>
</tr>
</thead>
<tbody>
<tr>
<td></td>
<td></td>
</tr>
</tbody>
</table>
On Windows, Intel drivers can be downloaded directly from Intel or from the OEM support site: https://www.intel.cn/content/www/cn/zh/download-center/home.html

AMD
For AMD GPUs on Linux, refer to AMD’s ROCm installation documentation: https://rocm.docs.amd.com/en/docs-5.0.2/deploy/linux/os-native/install.html
For Windows: https://rocm.docs.amd.com/en/docs-5.0.2/deploy/windows/install.html
NVIDIA
On Linux, install the NVIDIA driver and CUDA first. On Windows, GPU drivers can be installed with GeForce Experience, while CUDA should be downloaded from NVIDIA: https://developer.nvidia.cn/cuda-toolkit
Core hashcat options
-I, --backend-info
Shows available GPU/OpenCL driver information.
-m, --hash-type
Sets the hash mode explicitly. If you do not provide one, hashcat may auto-detect the format and suggest a mode.
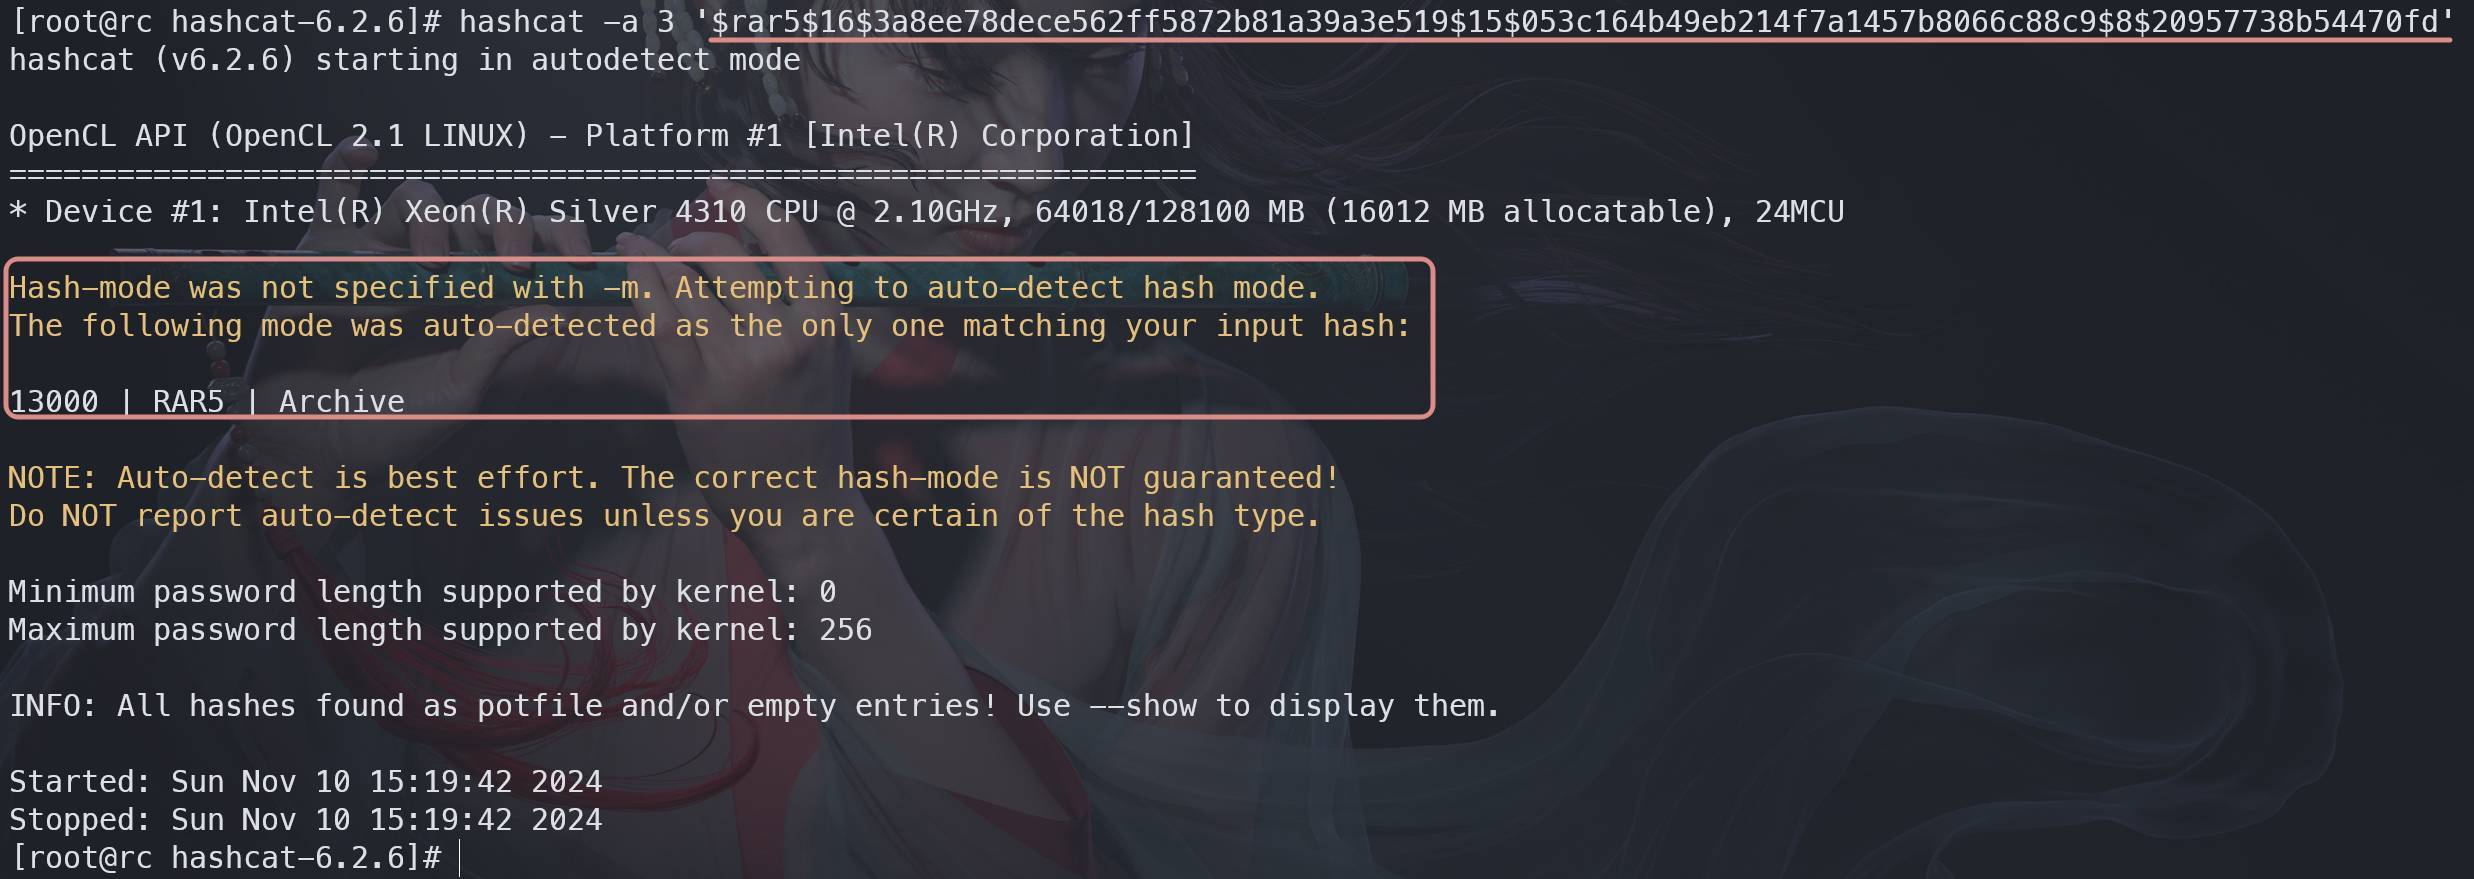
In the example above, hashcat identified mode 13000, which corresponds to RAR5.
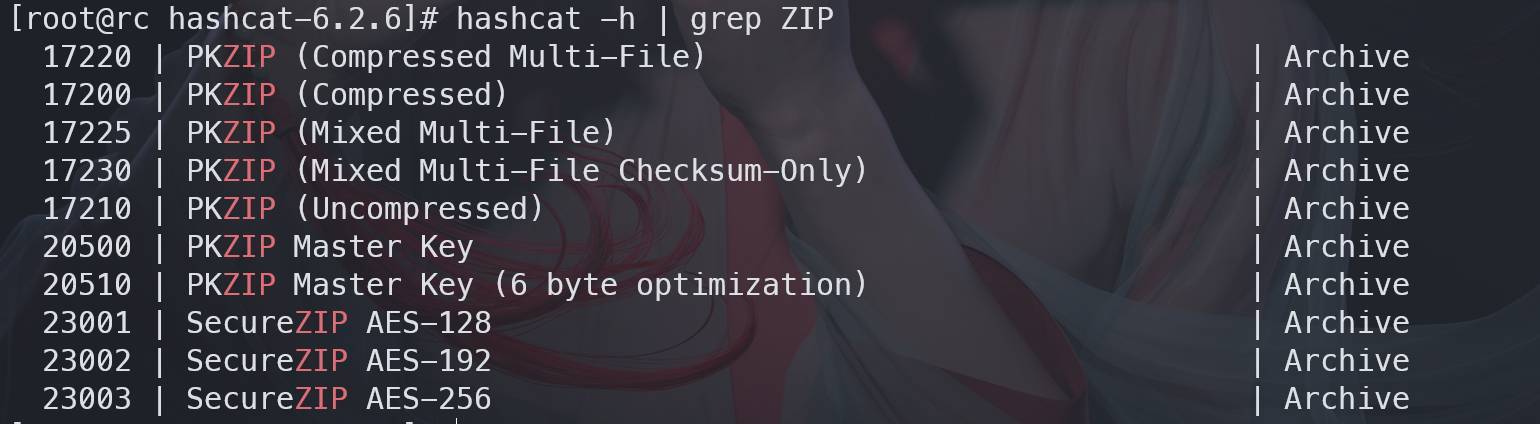
If you need to look up a mode manually, print the help text and search it. For example, to find ZIP-related modes:
When several possible modes exist, it is often faster to hand the hash directly to hashcat and let it narrow them down:
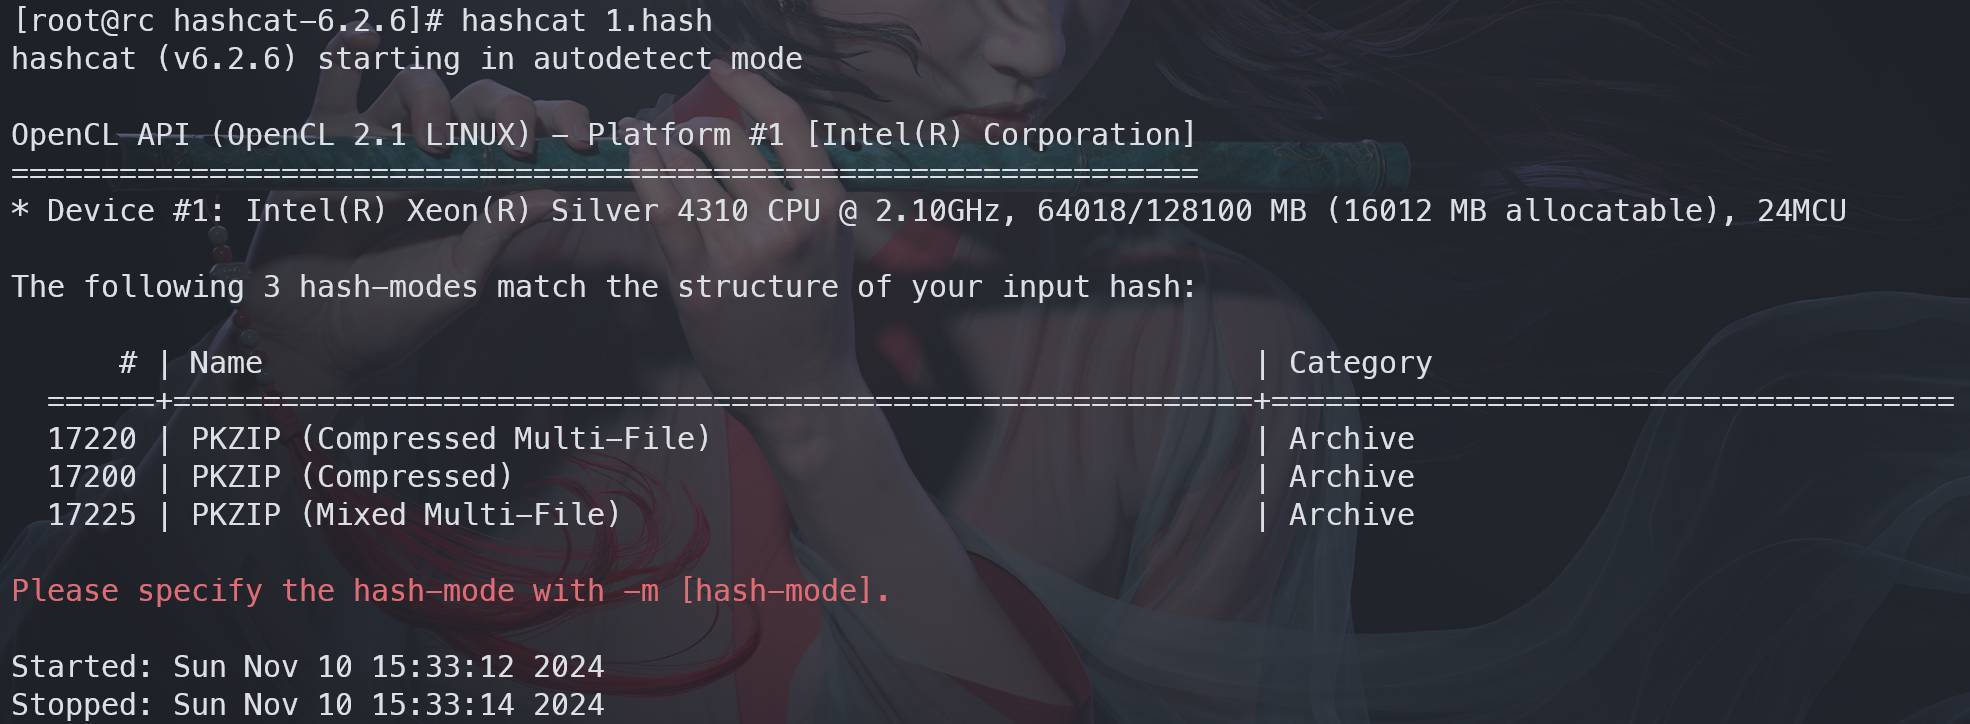
If more than one candidate mode is returned, test them one by one.
Common modes:
<table> <thead> <tr> <th>hash mode</th> <th>hash name</th> <th>example</th> </tr> </thead> <tbody> <tr> <td>0</td> <td>MD5</td> <td>8743b52063cd84097a65d1633f5c74f5</td>
</tr>
<tr>
<td>11600</td>
<td>7-Zip</td>
<td>$7z$0$19$0$salt$8$f6196259a7326e3f0000000000000000$185065650$112$98$f3bc2a88062c419a25acd40c0c2d75421cf23263f69c51b13f9b1aada41a8a09f9adeae45d67c60b56aad338f20c0dcc5eb811c7a61128ee0746f922cdb9c59096869f341c7a9cb1ac7bb7d771f546b82cf4e6f11a5ecd4b61751e4d8de66dd6e2dfb5b7d1022d2211e2d66ea1703f96</td>
</tr>
<tr>
<td>13000</td>
<td>RAR5</td>
<td>$rar5$16$74575567518807622265582327032280$15$f8b4064de34ac02ecabfe9abdf93ed6a$8$9843834ed0f7c754</td>
</tr>
<tr>
<td>17220</td>
<td>ZIP</td>
<td>$pkzip2$3*1*1*0*8*24*a425*8827*d1730095cd829e245df04ebba6c52c0573d49d3bbeab6cb385b7fa8a28dcccd3098bfdd7*1*0*8*24*2a74*882a*51281ac874a60baedc375ca645888d29780e20d4076edd1e7154a99bde982152a736311f*2*0*e3*1c5*eda7a8de*0*29*8*e3*eda7*5096*1455781b59707f5151139e018bdcfeebfc89bc37e372883a7ec0670a5eafc622feb338f9b021b6601a674094898a91beac70e41e675f77702834ca6156111a1bf7361bc9f3715d77dfcdd626634c68354c6f2e5e0a7b1e1ce84a44e632d0f6e36019feeab92fb7eac9dda8df436e287aafece95d042059a1b27d533c5eab62c1c559af220dc432f2eb1a38a70f29e8f3cb5a207704274d1e305d7402180fd47e026522792f5113c52a116d5bb25b67074ffd6f4926b221555234aabddc69775335d592d5c7d22462b75de1259e8342a9ba71cb06223d13c7f51f13be2ad76352c3b8ed*$/pkzip2$</td>
</tr>
<tr>
<td>22000</td>
<td>WPA2</td>
<td>WPA*02*024022795224bffca545276c3762686f*6466b38ec3fc*225edc49b7aa*54502d4c494e4b5f484153484341545f54455354*10e3be3b005a629e89de088d6a2fdc489db83ad4764f2d186b9cde15446e972e*0103007502010a0000000000000000000148ce2ccba9c1fda130ff2fbbfb4fd3b063d1a93920b0f7df54a5cbf787b16171000000000000000000000000000000000000000000000000000000000000000000000000000000000000000000000001630140100000fac040100000fac040100000fac028000*a2</td>
</tr>
<tr>
<td>1800</td>
<td>SHA512</td>
<td>$6$52450745$k5ka2p8bFuSmoVT1tzOyyuaREkkKBcCNqoDKzYiJL9RaE8yMnPgh2XzzF0NDrUhgrcLwg78xs1w5pJiypEdFX/</td>
</tr>
<tr>
<td>3000</td>
<td>LM</td>
<td>299bd128c1101fd6</td>
</tr>
<tr>
<td>1000</td>
<td>NTLM</td>
<td>b4b9b02e6f09a9bd760f388b67351e2b</td>
</tr>
</tbody>
</table>
Full mode list and sample hashes: https://hashcat.net/wiki/doku.php?id=example_hashes
-a, --attack-mode
Chooses the attack strategy:
<table> <thead> <tr> <th>mode</th> <th>meaning</th> </tr> </thead> <tbody> <tr> <td>0</td> <td>dictionary attack</td> </tr> <tr> <td>1</td> <td>combinator attack with two dictionaries</td> </tr> <tr> <td>3</td> <td>mask attack</td> </tr> <tr> <td>6</td> <td>dictionary + mask</td> </tr> <tr> <td>7</td> <td>mask + dictionary</td> </tr> </tbody> </table>-O, --optimized-kernel-enable
Enables optimized kernels for better speed, but limits password length to 32 characters. Without this flag, hashcat will warn you:


-o, --outfile
Writes recovered hash:plaintext pairs to a file.
--show
If you forgot to save the output, or the terminal was cleared, use --show with the same hash input to display already recovered results:

-i, --increment
Enables a password length range.
--increment-min
Sets the minimum length for incremental mode. It must be used together with -i or --increment, otherwise hashcat throws an error:

--increment-max
Sets the maximum length for incremental mode. It also requires -i or --increment.
-potfile-disable
Prevents cracked results from being written to the potfile, which is useful when you want to repeat the same crack again, for example while testing hash collisions. If the result has already been stored, you must remove the corresponding record manually.
On newer Linux builds, the potfile path is:
~/.local/share/hashcat/hashcat.potfile
It is not:
~/.hashcat/hashcat.potfile
On Windows, the potfile sits in the same directory as the main hashcat executable.

-d, --opencl-device-types
If hashcat -I lists multiple OpenCL devices, this option lets you choose which one to use. By default, hashcat uses all available devices.
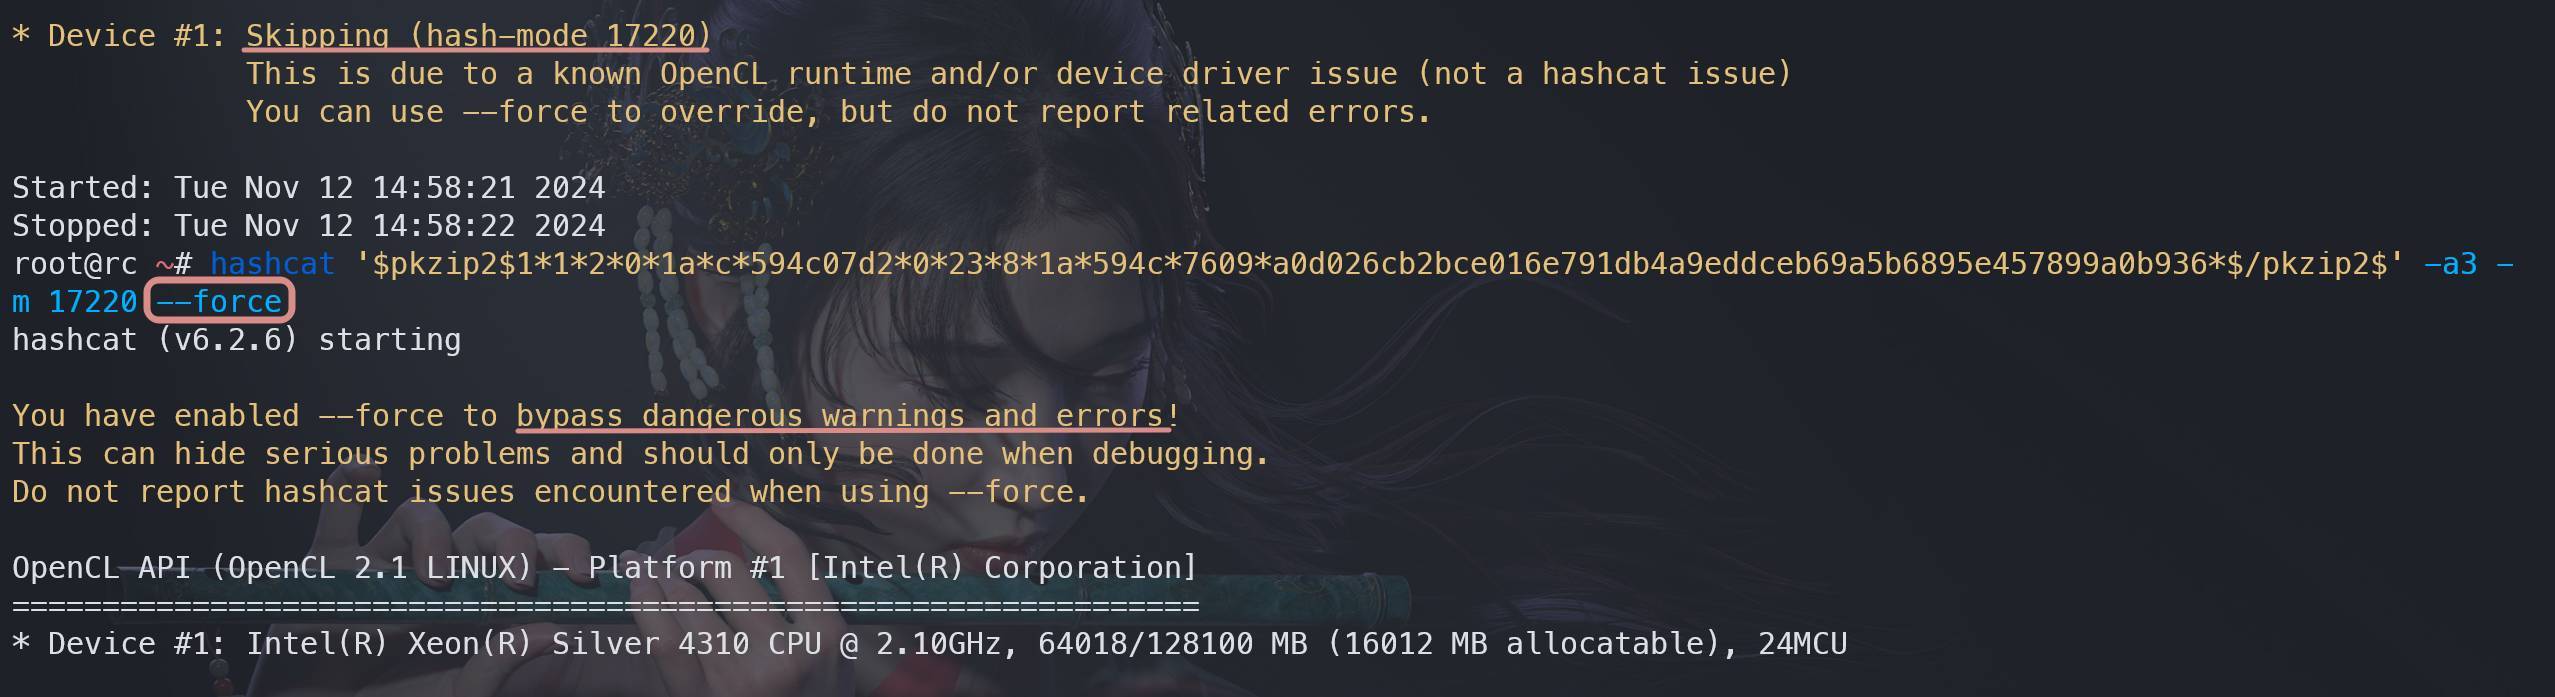
--force
Sometimes hashcat exits because of a hardware or compatibility warning. --force can make it continue anyway.
For example, if hashcat claims the hardware does not support a particular mode, this option may bypass the check:

--self-test-disable
Disables device self-tests at startup. This gets you to the cracking stage faster and is mostly useful during repeated testing.
-h, --help
Prints a very long help page. In practice, it is often paired with grep to search for a specific hash mode.
-v, --version
Prints the installed version:

As noted earlier, the latest stable release is v6.2.6, with beta builds available here: https://hashcat.net/beta/
Mask attacks (-a 3)
Mask mode is the most direct form of brute force. Instead of trying words from a list, you describe the password structure and hashcat enumerates all combinations that fit.
Built-in mask placeholders
<table> <thead> <tr> <th>placeholder</th> <th>meaning</th> </tr> </thead> <tbody> <tr> <td>?l</td>
<td>lowercase letters: a-z</td>
</tr>
<tr>
<td>?u</td>
<td>uppercase letters: A-Z</td>
</tr>
<tr>
<td>?d</td>
<td>digits: 0-9</td>
</tr>
<tr>
<td>?h</td>
<td>lowercase hexadecimal: 0-9, a-f</td>
</tr>
<tr>
<td>?H</td>
<td>uppercase hexadecimal: 0-9, A-F</td>
</tr>
<tr>
<td>?s</td>
<td>symbols: ! “ # $ % & ‘ ( ) * + , - . / : ; < = > ? @ [ \ ] ^ _ ` {</td>
</tr>
<tr>
<td>?a</td>
<td>all ASCII characters</td>
</tr>
<tr>
<td>?b</td>
<td>binary characters: 0, 1</td>
</tr>
</tbody>
</table>
Example masks
<table> <thead> <tr> <th>mask</th> <th>meaning</th> </tr> </thead> <tbody> <tr> <td>?d?d?d?d?d?d?d?d?d?d</td>
<td>10-digit numeric password</td>
</tr>
<tr>
<td>?u?u?u?u?u?u?u?u?u?u</td>
<td>10 uppercase letters</td>
</tr>
<tr>
<td>?d?d?d?d?d?l?l?l?l?l</td>
<td>5 digits + 5 lowercase letters</td>
</tr>
<tr>
<td>?l?u?d?d?d?d</td>
<td>1 lowercase, 1 uppercase, then 4 digits</td>
</tr>
<tr>
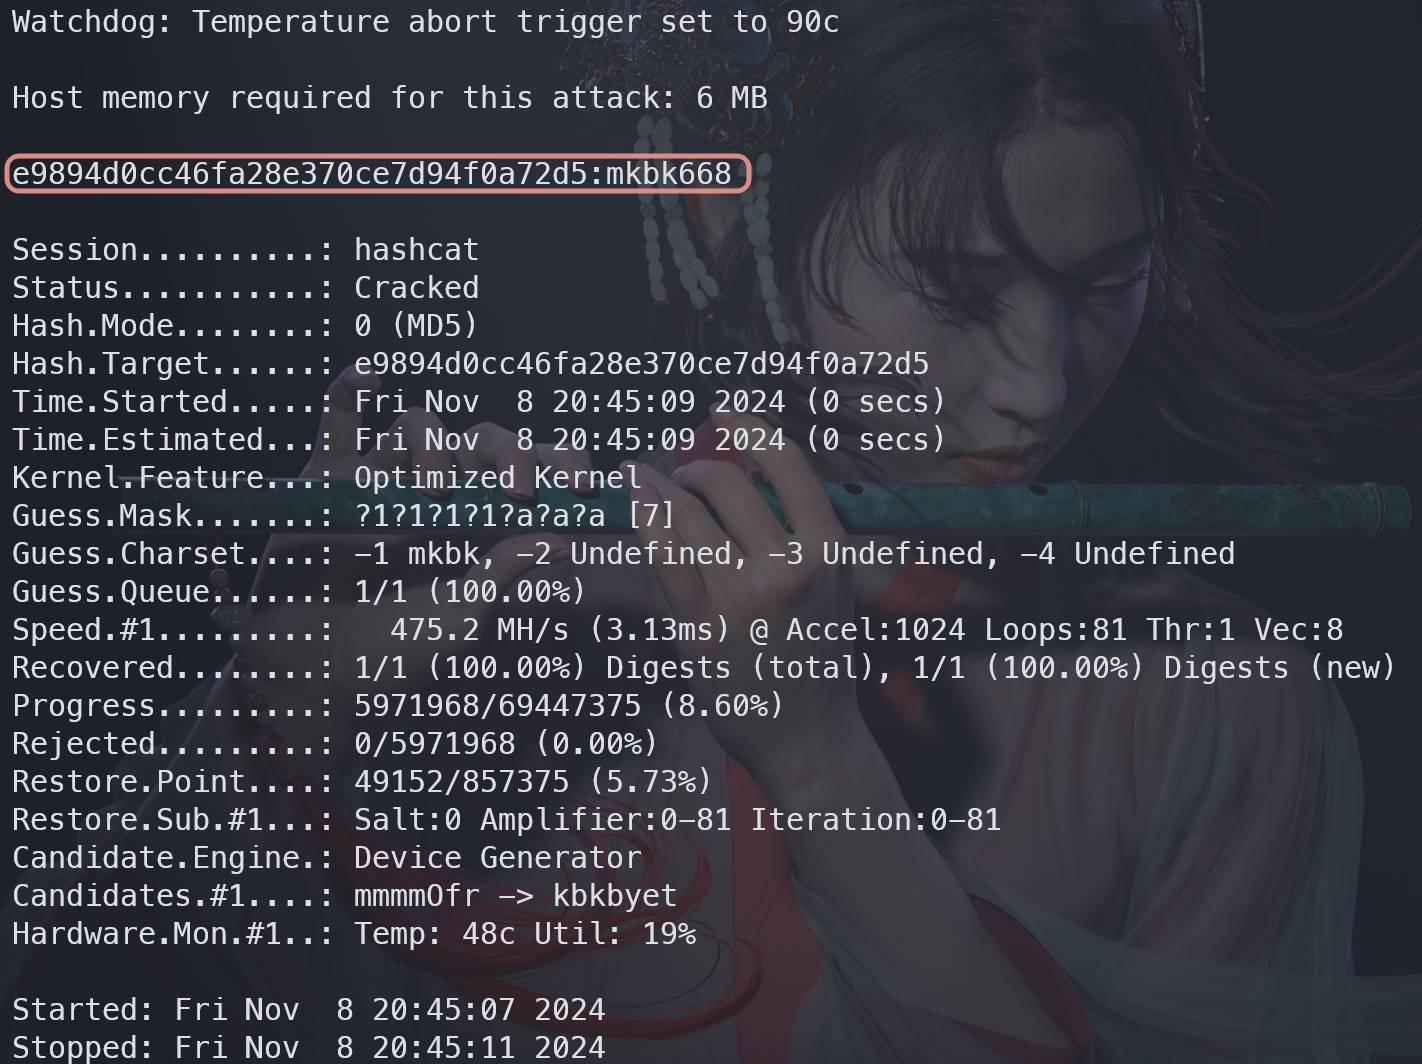
<td>mkbk?a?a?a</td>
<td>fixed prefix mkbk, followed by 3 arbitrary ASCII chars</td>
</tr>
</tbody>
</table>
Custom masks
Custom placeholders let you define your own character sets:
<table> <thead> <tr> <th>custom placeholder</th> <th>character set</th> </tr> </thead> <tbody> <tr> <td>?1</td>
<td>?l, ?d</td>
</tr>
<tr>
<td>?2</td>
<td>a, b, c, d</td>
</tr>
<tr>
<td>?3</td>
<td>e, f, g, h</td>
</tr>
<tr>
<td>?4</td>
<td>i, j, k, l</td>
</tr>
</tbody>
</table>
If you want ?1 to stand for the four characters m, k, b, k, define it with -1 and use it in the mask:
1</th>
<th>hashcat -m 0 -a 3 e9894d0cc46fa28e370ce7d94f0a72d5 -1 mkbk ?1?1?1?1?a?a?a -O</th>
</tr>
</thead>
<tbody>
<tr>
<td></td>
<td></td>
</tr>
</tbody>
</table>
Dictionary attacks (-a 0)
If the target password is likely to be common or human-made, a wordlist attack is often much faster than full brute force.
Recommended dictionary collection: https://github.com/wwl012345/PasswordDic
Basic usage:
<table> <thead> <tr> <th>1</th>
<th>hashcat -a 0 200ceb26807d6bf99fd6f4f0d1ca54d4 dict/rockyou-top15000.txt -O -o result.txt</th>
</tr>
</thead>
<tbody>
<tr>
<td></td>
<td></td>
</tr>
</tbody>
</table>
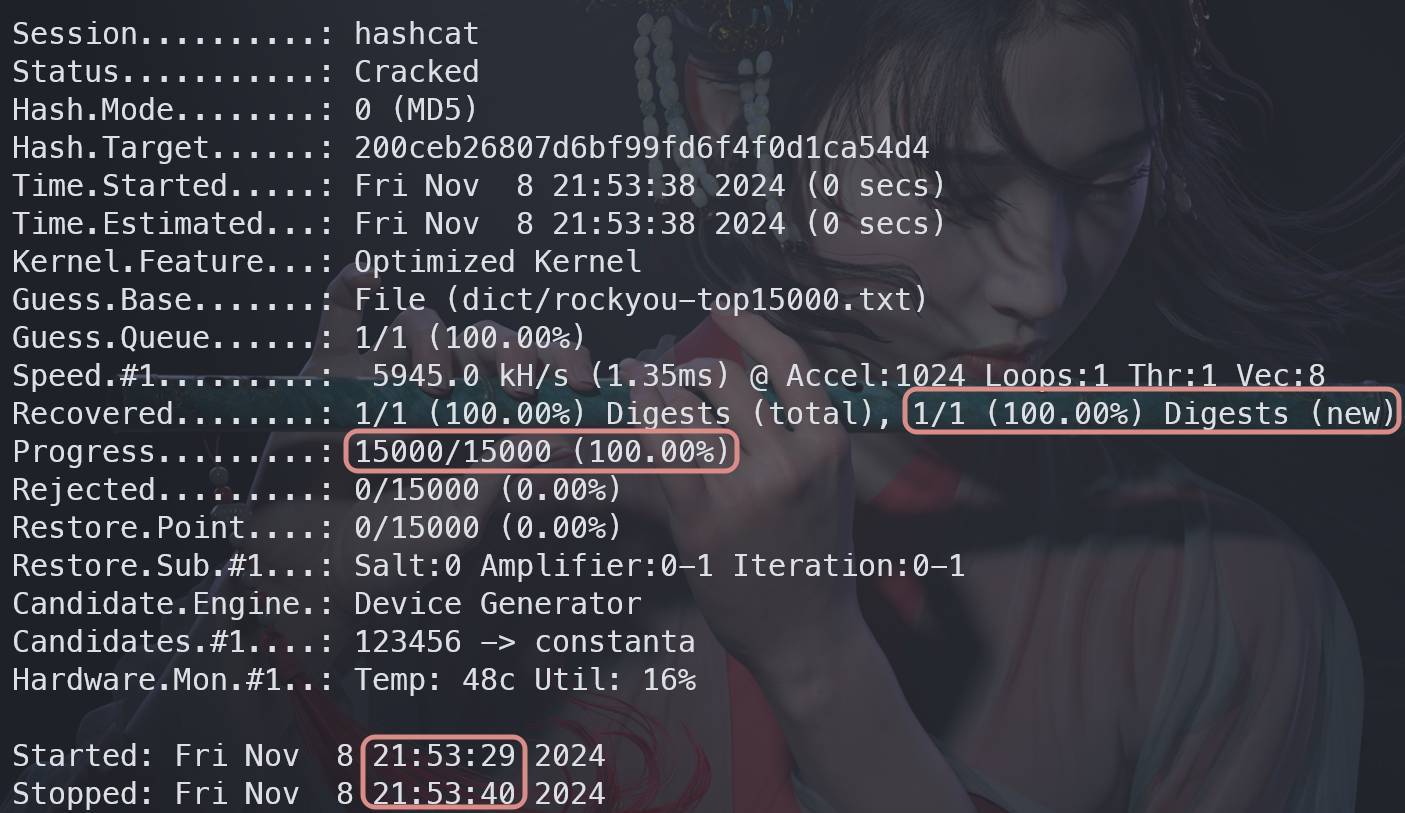
In the example, hashcat took 11 seconds, tested 15,000 candidates, and recovered the hash. The plaintext was not printed to the terminal because -o wrote the result to result.txt instead. You can either open the output file directly or rerun with --show:
1 2</th>
<th>cat result.txt hashcat -a 0 -m 0 200ceb26807d6bf99fd6f4f0d1ca54d4 dict/rockyou-top15000.txt -O --show</th>
</tr>
</thead>
<tbody>
<tr>
<td></td>
<td></td>
</tr>
</tbody>
</table>
Combinator attacks with two dictionaries (-a 1)
hashcat can combine words from two dictionaries. It takes one word from the first list as the prefix and one from the second list as the suffix.
If dict1.txt contains:
1 2</th>
<th>hello world</th>
</tr>
</thead>
<tbody>
<tr>
<td></td>
<td></td>
</tr>
</tbody>
</table>
and dict2.txt contains:
1 2</th>
<th>123 456</th>
</tr>
</thead>
<tbody>
<tr>
<td></td>
<td></td>
</tr>
</tbody>
</table>
the generated candidates are:
<table> <thead> <tr> <th>1 2 3 4</th>
<th>hello123 hello456 world123 world456</th>
</tr>
</thead>
<tbody>
<tr>
<td></td>
<td></td>
</tr>
</tbody>
</table>
Example:
<table> <thead> <tr> <th>1</th>
<th>hashcat -m 0 -a 1 34cf9968d4b20578f61c9b26d102fb59 dict/1.txt dict/2.txt -O</th>
</tr>
</thead>
<tbody>
<tr>
<td></td>
<td></td>
</tr>
</tbody>
</table>
Dictionary + mask (-a 6)
This mode appends a mask to each word in a dictionary.
If the plaintext is sunshine123 and the dictionary contains sunshine, you can recover it by adding a three-digit suffix mask:
1</th>
<th>hashcat -a 6 -m 0 1669972908967b4076b39d4626090817 dict/passwd-EN-Top10000.txt ?d?d?d -O</th>
</tr>
</thead>
<tbody>
<tr>
<td></td>
<td></td>
</tr>
</tbody>
</table>
Mask + dictionary (-a 7)
This is the reverse of -a 6: a mask comes first, then a dictionary word as the suffix.
If the plaintext is need_money and the dictionary includes money, the mask can be used for the prefix portion:
1</th>
<th>hashcat -a 6 -m 0 b4c80dd675a0d0f60d229075583d7d60 dict/passwd-EN-Top10000.txt ?l?l?l?l?s -O</th>
</tr>
</thead>
<tbody>
<tr>
<td></td>
<td></td>
</tr>
</tbody>
</table>
Common cracking scenarios
Cracking a 10-digit numeric MD5
First, generate the MD5 for 0123456789:
1 2 3 4 5 6 7</th>
<th># 使用md5sum命令(末尾的 - 表示标准输入) ❯ printf "0123456789" | md5sum 781e5e245d69b566979b86e28d23f2c7 - # 或者使用openssl命令 ❯ printf "0123456789" | openssl md5 MD5(stdin)= 781e5e245d69b566979b86e28d23f2c7</th>
</tr>
</thead>
<tbody>
<tr>
<td></td>
<td></td>
</tr>
</tbody>
</table>
Then crack it with a 10-digit mask:
<table> <thead> <tr> <th>1</th>
<th>hashcat -m 0 -a 3 781e5e245d69b566979b86e28d23f2c7 ?d?d?d?d?d?d?d?d?d?d</th>
</tr>
</thead>
<tbody>
<tr>
<td></td>
<td></td>
</tr>
</tbody>
</table>
This took 4 seconds, tried 3,072,000 combinations, and recovered the plaintext 0123456789.
To display the recovered plaintext later:
<table> <thead> <tr> <th>1 2 3 4</th>
<th>❯ hashcat -m 0 -a 3 781e5e245d69b566979b86e28d23f2c7 ?d?d?d?d?d?d?d?d?d?d --show 781e5e245d69b566979b86e28d23f2c7:0123456789 ❯ hashcat -m 0 781e5e245d69b566979b86e28d23f2c7 --show 781e5e245d69b566979b86e28d23f2c7:0123456789</th>
</tr>
</thead>
<tbody>
<tr>
<td></td>
<td></td>
</tr>
</tbody>
</table>
Cracking an MD5 with unknown length and unknown character pattern
If you know neither the length nor the structure, you cannot build a useful mask. In that case, hashcat defaults to ?a (all ASCII characters) and starts from shorter candidates before moving upward. If -O is enabled, the maximum length defaults to 32 characters.
This can become extremely slow if the actual password is long.
<table> <thead> <tr> <th>1</th>
<th>hashcat -m 0 -a 3 2e8e673825e962ccd6ce3ac8be404914 -O</th>
</tr>
</thead>
<tbody>
<tr>
<td></td>
<td></td>
</tr>
</tbody>
</table>
Known length, unknown pattern
If you know the plaintext length is 7 but do not know its character pattern, incremental mode lets hashcat brute-force that exact length while still using ?a automatically:
1</th>
<th>hashcat.bin -m 0 -a 3 9a33543ee42bb7791905ab66ed0555d9 -O --increment --increment-min 7 --increment-max 7</th>
</tr>
</thead>
<tbody>
<tr>
<td></td>
<td></td>
</tr>
</tbody>
</table>
Known character set, unknown length
If you know the password uses only lowercase and uppercase letters, but you do not know the length, define a custom charset with ?l?u and increase the number of ?1 placeholders step by step until it matches:
1 2 3 4 5</th>
<th># 尝试1位长度 ./hashcat.bin -m 0 -a 3 c44a471bd78cc6c2fea32b9fe028d30a -O -1 ?l?u ?1 # 尝试4位长度 ./hashcat.bin -m 0 -a 3 c44a471bd78cc6c2fea32b9fe028d30a -O -1 ?l?u ?1?1?1?1</th>
</tr>
</thead>
<tbody>
<tr>
<td></td>
<td></td>
</tr>
</tbody>
</table>
WPA2 Wi-Fi password cracking
To attack WPA2, you first need to capture a wireless handshake with a tool such as aircrack-ng. After obtaining a .cap file, convert it to hashcat’s .hc22000 format.
For smaller captures, the official web converter can do this: https://hashcat.net/cap2hashcat/
If the capture is larger than 20 MB, local conversion with hcxtools is needed.
Once you have the .hc22000 file, run hashcat like this:
1</th>
<th>hashcat -m 22000 -a 0 ~/903031_1731148635.hc22000 dict/passwd-CN-Top10000.txt # 字典破解</th>
</tr>
</thead>
<tbody>
<tr>
<td></td>
<td></td>
</tr>
</tbody>
</table>
Cracking archive passwords
RAR
A common workflow is: 1. Create or obtain the encrypted archive. 2. Extract the archive hash with John the Ripper. 3. Identify or confirm the hashcat mode. 4. Run the attack.
A web-based extractor can also be used for RAR hashes: https://hashes.com/zh/johntheripper/rar2john
Extracting and cracking RAR on Windows
Download the prebuilt John the Ripper package: https://www.openwall.com/john/k/john-1.9.0-jumbo-1-win64.7z
After extraction, enter the run directory and extract the hash:
1</th>
<th>rar2john.exe <rar文件></th>
</tr>
</thead>
<tbody>
<tr>
<td></td>
<td></td>
</tr>
</tbody>
</table>
Copy only the hash itself. Do not copy the archive path or the colon before it.
To search RAR modes:
<table> <thead> <tr> <th>1</th>
<th>hashcat.exe -h | findstr.exe RAR</th>
</tr>
</thead>
<tbody>
<tr>
<td></td>
<td></td>
</tr>
</tbody>
</table>
Mode 13000 is RAR5. You can also pass the hash alone and let hashcat auto-detect it.
Cracking example:
<table> <thead> <tr> <th>1</th>
<th>hashcat.exe -m 13000 -a 3 $rar5$16$3a8ee78dece562ff5872b81a39a3e519$15$053c164b49eb214f7a1457b8066c88c9$8$20957738b54470fd ?d?d?d?d?d?d?d?d</th>
</tr>
</thead>
<tbody>
<tr>
<td></td>
<td></td>
</tr>
</tbody>
</table>
Extracting and cracking RAR on Linux
Build and install John the Ripper:
<table> <thead> <tr> <th>1 2 3 4 5 6 7</th>
<th>apt install git libssl-dev -y # Debian/Ubuntu 安装依赖 yum install -y openssl openssl-devel # RHEL/CentOS 安装依赖 git clone [email protected]:openwall/john.git # 克隆源码 cd john/src ./configure && make # 编译 cd ../run ./john --test # 测试jtr是否可用</th>
</tr>
</thead>
<tbody>
<tr>
<td></td>
<td></td>
</tr>
</tbody>
</table>
Then extract the RAR hash and check the mode:
<table> <thead> <tr> <th>1 2</th>
<th>./rar2john <rar文件> hashcat -h | grep RAR</th>
</tr>
</thead>
<tbody>
<tr>
<td></td>
<td></td>
</tr>
</tbody>
</table>
Run hashcat:
<table> <thead> <tr> <th>1</th>
<th>hashcat -m 13000 -a 3 '$rar5$16$3a8ee78dece562ff5872b81a39a3e519$15$053c164b49eb214f7a1457b8066c88c9$8$20957738b54470fd' '?d?d?d?d?d?d?d?d'</th>
</tr>
</thead>
<tbody>
<tr>
<td></td>
<td></td>
</tr>
</tbody>
</table>
Note that RAR hashes on Linux should be wrapped in single quotes. On Windows, do not add them. If the shell is zsh, the mask usually needs quoting too.
Recovered plaintext: 88888888
ZIP
The ZIP process is almost the same: extract the hash with John the Ripper, strip off the archive/file path metadata, identify the mode, then crack.
1. Extract the hash
For example, 1.zip may produce output like:
1</th>
<th>1.zip/1.txt:$pkzip2$1*1*2*0*1a*c*594c07d2*0*23*8*1a*594c*7609*a0d026cb2bce016e791db4a9eddceb69a5b6895e457899a0b936*$/pkzip2$:1.txt:1.zip::E:\user\lololowe\Desktop\1.zip</th>
</tr>
</thead>
<tbody>
<tr>
<td></td>
<td></td>
</tr>
</tbody>
</table>
You must keep only the actual hash:
<table> <thead> <tr> <th>1</th>
<th>$pkzip2$1*1*2*0*1a*c*594c07d2*0*23*8*1a*594c*7609*a0d026cb2bce016e791db4a9eddceb69a5b6895e457899a0b936*$/pkzip2$</th>
</tr>
</thead>
<tbody>
<tr>
<td></td>
<td></td>
</tr>
</tbody>
</table>
2. Identify the mode
Let hashcat analyze the hash directly:
<table> <thead> <tr> <th>1</th>
<th>hashcat '$pkzip2$1*1*2*0*1a*c*594c07d2*0*23*8*1a*594c*7609*a0d026cb2bce016e791db4a9eddceb69a5b6895e457899a0b936*$/pkzip2$'</th>
</tr>
</thead>
<tbody>
<tr>
<td></td>
<td></td>
</tr>
</tbody>
</table>
If three candidate modes are shown, try them one by one.
3. Crack it
<table> <thead> <tr> <th>1</th>
<th>hashcat '$pkzip2$1*1*2*0*1a*c*594c07d2*0*23*8*1a*594c*7609*a0d026cb2bce016e791db4a9eddceb69a5b6895e457899a0b936*$/pkzip2$' -a 3 -m 17220 -O</th>
</tr>
</thead>
<tbody>
<tr>
<td></td>
<td></td>
</tr>
</tbody>
</table>
Recovered plaintext: 123456
There is also an online ZIP password cracking tool here: https://rivers.chaitin.cn/tools/zipcrack
7-Zip
1. Extract the hash
John the Ripper uses the 7z2john.pl Perl script for this, but extraction is not always reliable.
A simpler option is this online extractor: https://hashes.com/en/johntheripper/7z2john
2. Identify the mode
<table> <thead> <tr> <th>1</th>
<th>hashcat '$7z$2$19$0$$16$f1ac8b88d28393a8ec6b55eda4c9f6a1$1498154962$16$16$6b60d3f0d467c15c7a3371b75733bc89$12$00'</th>
</tr>
</thead>
<tbody>
<tr>
<td></td>
<td></td>
</tr>
</tbody>
</table>
The final line in hashcat’s output indicates that this hash mode has a collision weakness: one hash may correspond to multiple passwords. If you want hashcat to continue looking after the first hit, use --keep-guessing.
3. Crack it
<table> <thead> <tr> <th>1</th>
<th>hashcat '$7z$2$19$0$$16$f1ac8b88d28393a8ec6b55eda4c9f6a1$1498154962$16$16$6b60d3f0d467c15c7a3371b75733bc89$12$00' -m 11600 -a 3 -O</th>
</tr>
</thead>
<tbody>
<tr>
<td></td>
<td></td>
</tr>
</tbody>
</table>
Recovered plaintext: 55sme
MySQL password cracking
First, retrieve the root password hash:
<table> <thead> <tr> <th>1</th>
<th>SELECT user, Host, authentication_string FROM mysql.user WHERE `User` = 'root';</th>
</tr>
</thead>
<tbody>
<tr>
<td></td>
<td></td>
</tr>
</tbody>
</table>
Do not copy the leading * character.
Then let hashcat identify the format:
<table> <thead> <tr> <th>1</th>
<th>hashcat 81F5E21E35407D884A6CD4A731AEBFB6AF209E1B</th>
</tr>
</thead>
<tbody>
<tr>
<td></td>
<td></td>
</tr>
</tbody>
</table>
Use the recommended mode 300 (MySQL4.1/MySQL5) and a mask attack:
1</th>
<th>hashcat 81F5E21E35407D884A6CD4A731AEBFB6AF209E1B -m 300 -a 3 -O</th>
</tr>
</thead>
<tbody>
<tr>
<td></td>
<td></td>
</tr>
</tbody>
</table>
Recovered plaintext: root
KeePass database cracking
KeePass stores passwords inside an encrypted KDBX database.
You can extract the hash with keepass2john, or try the online extractor here:
https://hashes.com/zh/johntheripper/keepass2john
Remove the leading Database: prefix, pass the hash to hashcat, and it will identify the correct mode.
Example:
<table> <thead> <tr> <th>1</th>
<th>hashcat '$keepass$*2*600000*0*ff332ebf333c88d87a9592307e297d4cac49184a359dc9b655d5d8490c404640*4878daf470d66264c3b3b085cb1d0495f8d2f20459193c1cbe17722d7e61ba9d*2a021d8a51c7955ea1d06409bd8822ed*ecdd6dd88837ede059f6fe7b758975ef4ab4193261beac50b641f5fdac250093*6bfdc8f6ae7313cadb0d2ac2adecbf4eab703ac3eb7fefe4e6a9b838e7b92464' -m 13400 -a 3 -O</th>
</tr>
</thead>
<tbody>
<tr>
<td></td>
<td></td>
</tr>
</tbody>
</table>
Recovered plaintext: mkbk
Windows password cracking
LM hashes
Older systems such as Windows XP and Windows Server 2003 used LM by default.
The empty LM hash is:
AAD3B435B51404EEAAD3B435B51404EE
To extract credentials with Mimikatz on Windows Server 2008 R2:
<table> <thead> <tr> <th>1</th>
<th>mimikatz.exe "privilege::debug" "sekurlsa::logonpasswords" exit</th>
</tr>
</thead>
<tbody>
<tr>
<td></td>
<td></td>
</tr>
</tbody>
</table>
Suppose the extracted LM hash is:
af01df70036ebacfaad3b435b51404ee
An LM hash has 32 hex characters. The first 16 correspond to the first 7 password characters, and the last 16 correspond to the next 7. If the password is 7 characters or fewer, the second half is fixed as aad3b435b51404ee. LM passwords are limited to 14 characters total.
Since the second half of this sample is the fixed empty half, the password length is 7 or less. That means the first 16 characters can be cracked directly.
First identify the mode:
<table> <thead> <tr> <th>1</th>
<th>hashcat af01df70036ebacf</th>
</tr>
</thead>
<tbody>
<tr>
<td></td>
<td></td>
</tr>
</tbody>
</table>
Then brute-force it:
<table> <thead> <tr> <th>1</th>
<th>hashcat -m 3000 af01df70036ebacf -a 3 -O '?a?a?a?d?d?d?s'</th>
</tr>
</thead>
<tbody>
<tr>
<td></td>
<td></td>
</tr>
</tbody>
</table>
Recovered plaintext: Abc123!
LM does not preserve case, so letter case is not significant in the original algorithm.
NTLM hashes
From Windows Vista and Windows Server 2008 onward, NTLM is stored by default instead of LM.
If LM is absent, the LM field appears as:
aad3b435b51404eeaad3b435b51404ee
The empty NTLM hash is:
31D6CFE0D16AE931B73C59D7E0C089C0
Credential extraction is the same as above. For NTLM, a simple example is:
<table> <thead> <tr> <th>1</th>
<th>hashcat -m 1000 -a 3 32ed87bdb5fdc5e9cba88547376818d4 -O</th>
</tr>
</thead>
<tbody>
<tr>
<td></td>
<td></td>
</tr>
</tbody>
</table>
Linux password cracking
Linux password hashes are typically taken from /etc/shadow:
1</th>
<th>tail /etc/shadow -n 1</th>
</tr>
</thead>
<tbody>
<tr>
<td></td>
<td></td>
</tr>
</tbody>
</table>
In /etc/shadow, the second field contains the password hash and usually follows the form:
$type$salt$encrypted
typeidentifies the algorithmsaltis the random saltencryptedis the result of hashing the plaintext with the salt throughcrypt
Common identifiers:
1= MD52= Blowfish, early version with flaws, not recommended2a= improved Blowfish variant, but still problematic2b= corrected Blowfish version, commonly used and considered safe2y= Eksblowfish varianty= Yescrypt, a Blowfish-derived scheme with better security and performance; hashcat does not currently support it5= SHA2566= SHA512
To identify a mode:
<table> <thead> <tr> <th>1</th>
<th>hashcat '$1$PIdhJQ1b$6yidVdMl8VlsnVfiWsRu..'</th>
</tr>
</thead>
<tbody>
<tr>
<td></td>
<td></td>
</tr>
</tbody>
</table>
To crack it:
<table> <thead> <tr> <th>1</th>
<th>hashcat '$1$PIdhJQ1b$6yidVdMl8VlsnVfiWsRu..' -m 500 -a 3 -O</th>
</tr>
</thead>
<tbody>
<tr>
<td></td>
<td></td>
</tr>
</tbody>
</table>
Recovered plaintext: test
PDF password cracking
One way to prepare a test sample is to encrypt a PDF with WPS.
Then extract the hash with John the Ripper’s pdf2john.pl:
1</th>
<th>perl pdf2john.pl <文件路径></th>
</tr>
</thead>
<tbody>
<tr>
<td></td>
<td></td>
</tr>
</tbody>
</table>
An online extractor is also available: https://www.onlinehashcrack.com/tools-pdf-hash-extractor.php
Let hashcat identify the mode:
<table> <thead> <tr> <th>1</th>
<th>hashcat '$pdf$4*4*128*-3904*0*16*f7b5882fa6583b73085398d2bf3e2eca*32*be6b1917664ce051136456751db1ad106681bfa2d6c40fd1996d4290804ea411*32*b33e83218acdc4e2d4bab4752bc67bf583707812d6700f8901d1012931595d58'</th>
</tr>
</thead>
<tbody>
<tr>
<td></td>
<td></td>
</tr>
</tbody>
</table>
Brute-force example:
<table> <thead> <tr> <th>1</th>
<th>hashcat '$pdf$4*4*128*-3904*0*16*f7b5882fa6583b73085398d2bf3e2eca*32*be6b1917664ce051136456751db1ad106681bfa2d6c40fd1996d4290804ea411*32*b33e83218acdc4e2d4bab4752bc67bf583707812d6700f8901d1012931595d58' -m 10500 -a 3 -O '?d?d?d?d?d?d?d?d?d'</th>
</tr>
</thead>
<tbody>
<tr>
<td></td>
<td></td>
</tr>
</tbody>
</table>
Recovered plaintext: 789456123
Saving and restoring progress
If a long-running job is interrupted, hashcat can save and resume its state.
Set a session name:
<table> <thead> <tr> <th>1</th>
<th>hashcat 02cc5e493ad4e7cfacb34b7d5f335356 -m 0 -a 3 -O --session myhash</th>
</tr>
</thead>
<tbody>
<tr>
<td></td>
<td></td>
</tr>
</tbody>
</table>
Restore it later without specifying the hash again:
<table> <thead> <tr> <th>1</th>
<th>hashcat --session myhash --restore</th>
</tr>
</thead>
<tbody>
<tr>
<td></td>
<td></td>
</tr>
</tbody>
</table>
Session files are stored in:
~/.local/share/hashcat/sessions/
Practical password advice
A few defensive takeaways are hard to ignore once you have used a tool like hashcat:
- Use passwords that are at least 12 characters long, ideally 16 or more.
- Mix uppercase letters, lowercase letters, numbers, and special characters.
- Use a unique password for every account to prevent credential stuffing.
- Avoid personal details such as birthdays or addresses, since those often leak in real-world breaches.
- Avoid obvious sequences like
ABCD,1234, or patterns such as666888.
References
- https://hashcat.net/forum/printthread.php?tid=9594
- https://hashcat.net/wiki/
- https://www.sqlsec.com/2019/10/hashcat.html
- https://hashcat.net/wiki/doku.php?id=example_hashes
- https://superuser.com/questions/1329977/jtr-requires-openssl-and-openssl-devel-being-installed
- https://blog.csdn.net/qq_43750882/article/details/130713566