If you already spend most of your day in VS Code, switching to AI editors such as Kiro, Cursor, or Trae is much less dramatic than it first looks. Their settings, extension ecosystem, and general editing habits are largely shared with VS Code. In fact, tools like Kiro and Cursor are built as variants on top of the open-source VS Code base.
If this is your first time using a VS Code-style editor, the same setup process still applies: install the extensions you need, adjust the settings, and then get familiar with the AI-specific features.
The examples below use Kiro, but the same ideas apply to similar AI editors.
Installing extensions
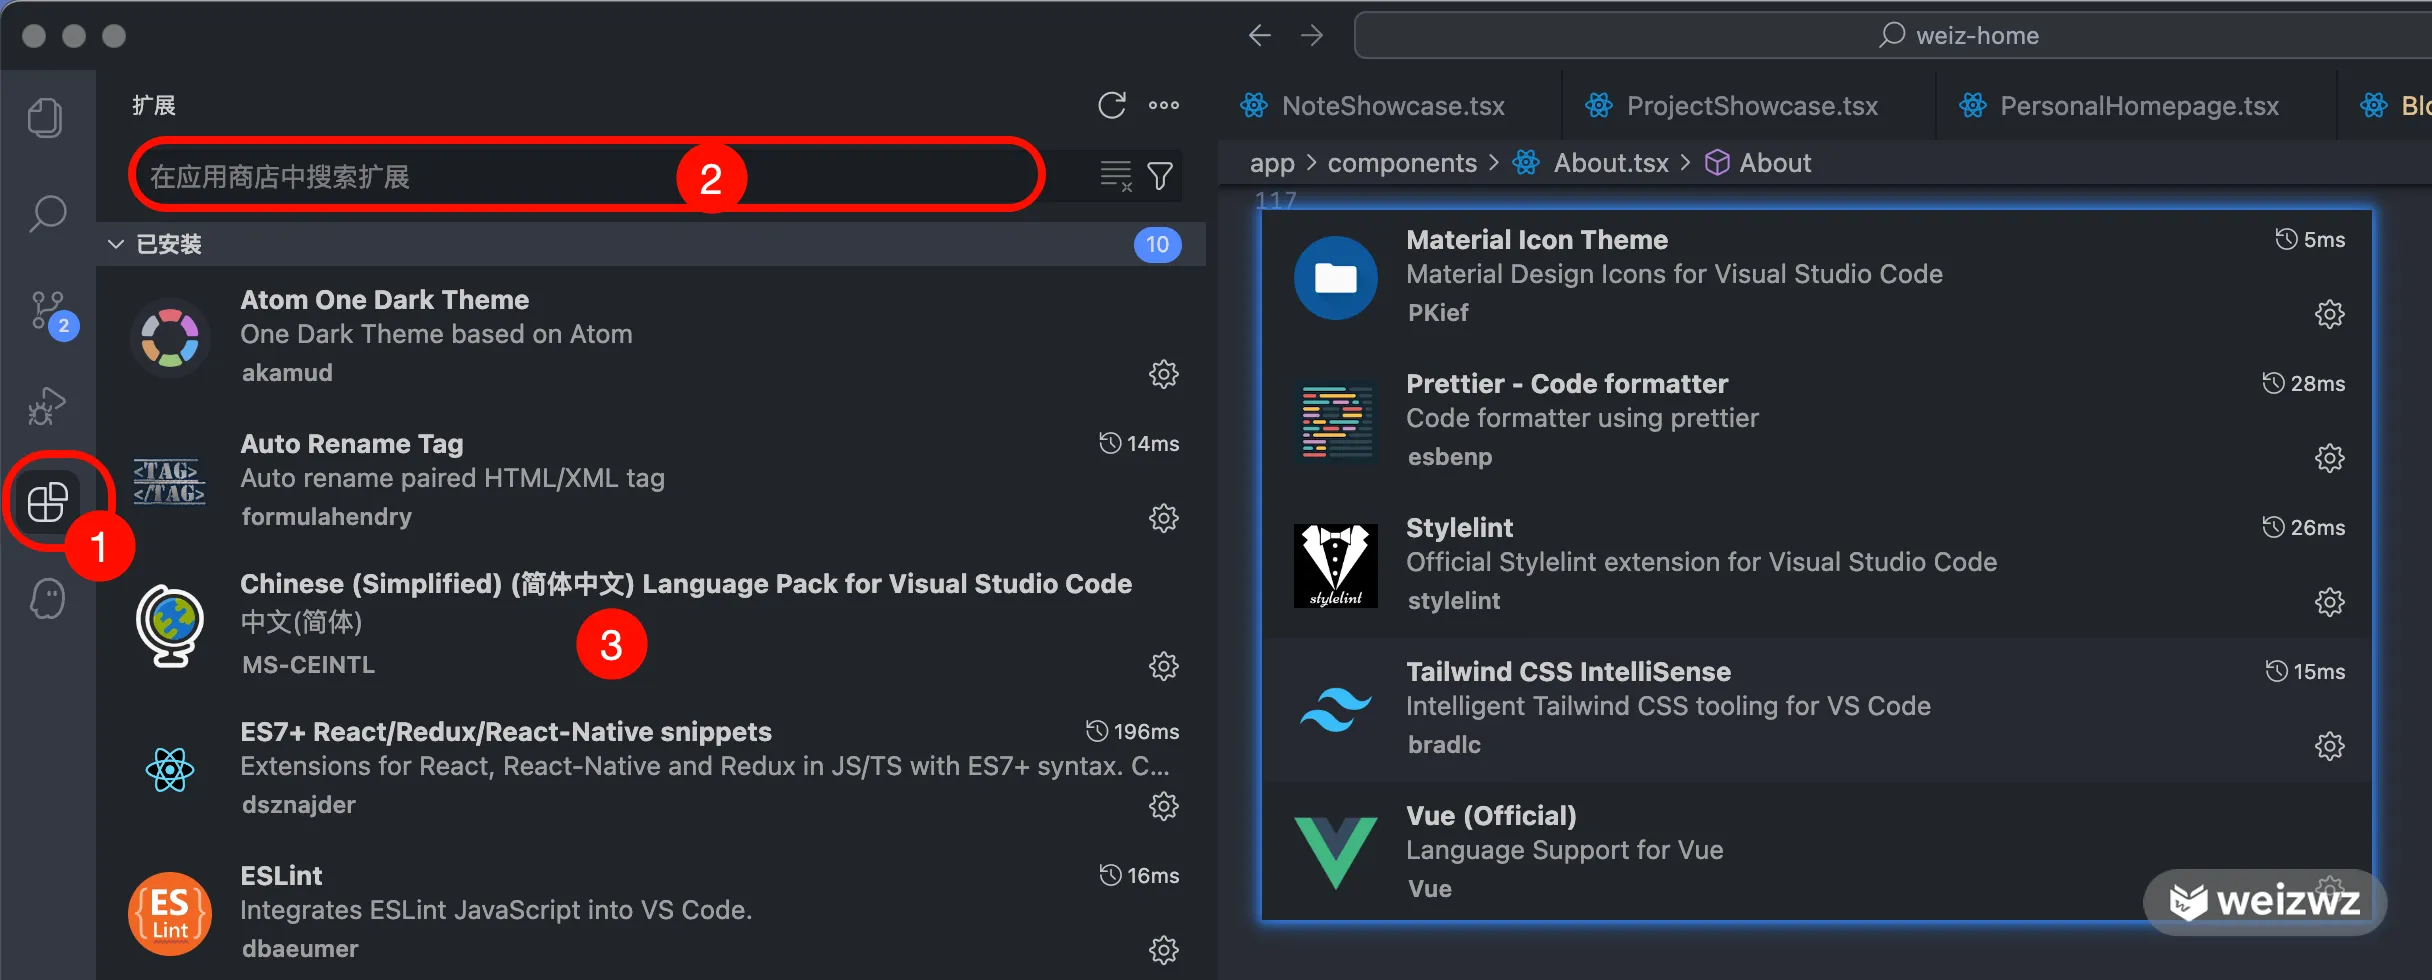
Open the Extensions panel from the entry marked as 1 in the screenshot. Type the extension name into the search box shown at 2, then install the extension you want.
For users who prefer a Chinese interface, search for Chinese and install the Chinese language extension, as shown at 3. If you mainly work on frontend development, the extensions shown in the screenshot are a practical starting point; just search for their names and install them one by one.
Changing editor settings
There are two common ways to modify settings:
- Use the visual settings page, shown at 1 in the screenshot.
- Open and edit the JSON settings file directly, shown at 2. You can open the command palette with
shift + command + p.
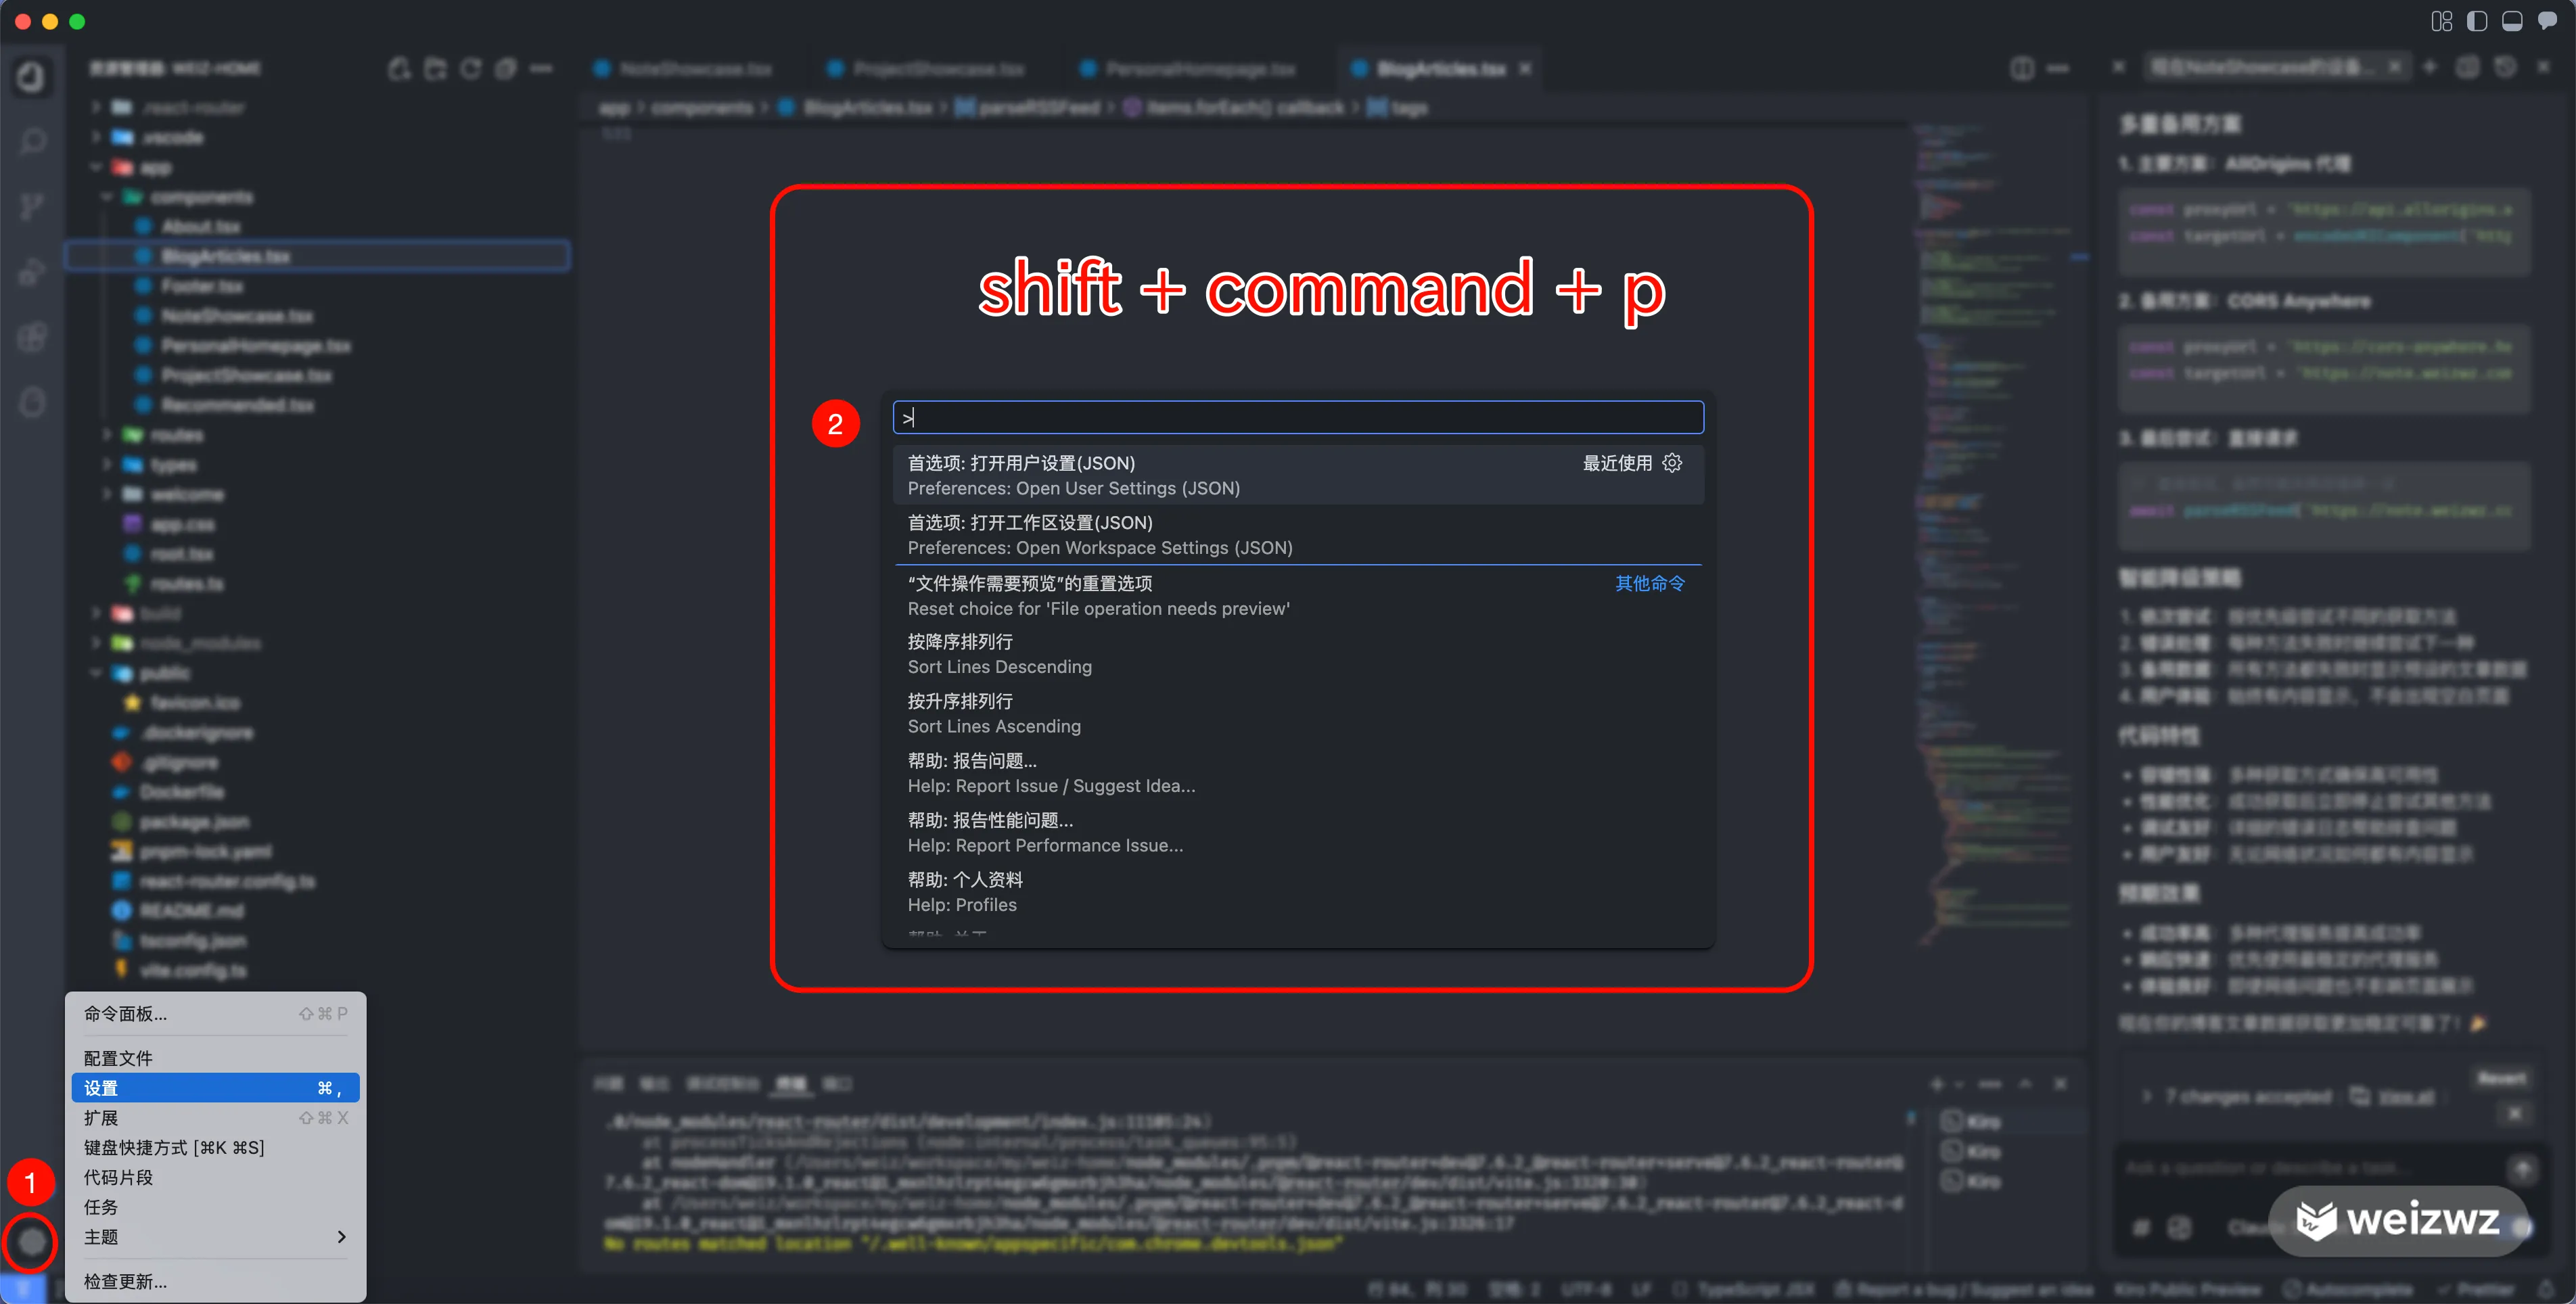
Editing the JSON file directly is usually faster.
If you already have a VS Code setup, open your VS Code settings file and copy the relevant configuration over. If you are starting from scratch, the following configuration can be used as a reference:
{
  "workbench.colorTheme": "Atom One Dark",
  "workbench.startupEditor": "none",
  "workbench.iconTheme": "material-icon-theme",
  "material-icon-theme.activeIconPack": "vue",
  "git.autofetch": true,
  "git.enableSmartCommit": true,
  "git.confirmSync": false,
  "git.ignoreMissingGitWarning": true,
  "git.openRepositoryInParentFolders": "never",
  "editor.tabSize": 2,
  "editor.fontFamily": "FiraCode Nerd Font, Consolas, 'Courier New', monospace",
  "editor.fontSize": 12,
  "editor.formatOnSaveMode": "modificationsIfAvailable",
  "editor.defaultFormatter": "esbenp.prettier-vscode",
  "javascript.format.semicolons": "remove",
  // 定义如何处理可选分号。
  //  - ignore: 不要插入或删除任何分号。
  //  - insert: 在语句末尾插入分号。
  //  - remove: 删除不必要的分号。
  "javascript.updateImportsOnFileMove.enabled": "always",
  "typescript.updateImportsOnFileMove.enabled": "always",
  "[javascript]": {
    "editor.defaultFormatter": "esbenp.prettier-vscode"
  },
  "[css]": {
    "editor.defaultFormatter": "vscode.css-language-features"
    // "editor.defaultFormatter": "esbenp.prettier-vscode"
  },
  "[scss]": {
    "editor.defaultFormatter": "vscode.css-language-features"
  },
  "[typescriptreact]": {
    "editor.defaultFormatter": "esbenp.prettier-vscode"
  },
  "[typescript]": {
    "editor.defaultFormatter": "esbenp.prettier-vscode"
  },
  "[jsonc]": {
    "editor.defaultFormatter": "esbenp.prettier-vscode"
  },
  "[vue]": {
    "editor.defaultFormatter": "esbenp.prettier-vscode"
  },
  "[json]": {
    "editor.defaultFormatter": "vscode.json-language-features"
  },
  "security.workspace.trust.untrustedFiles": "open",
  "[html]": {
    "editor.defaultFormatter": "vscode.html-language-features"
  },
  "[less]": {
    "editor.defaultFormatter": "esbenp.prettier-vscode"
  },
  "[markdown]": {
    "editor.quickSuggestions": {
      "comments": "on",
      "strings": "on",
      "other": "on"
    },
    "diffEditor.ignoreTrimWhitespace": false
  },
  "prettier.bracketSameLine": true,
  "prettier.jsxSingleQuote": true,
  "prettier.semi": false,
  "prettier.singleQuote": true,
  "prettier.trailingComma": "none",
  "prettier.printWidth": 160,
  "html.format.wrapLineLength": 500,
  "html.format.wrapAttributes": "preserve-aligned",
  "files.associations": {
    "manifest.json": "jsonc",
    "pages.json": "jsonc"
  },
  "explorer.confirmDelete": false,
  "diffEditor.ignoreTrimWhitespace": false,
  "stylelint.packageManager": "pnpm",
  "terminal.integrated.env.windows": {},
  "extensions.ignoreRecommendations": true,
  "kiroAgent.agentModelSelection": "CLAUDE_SONNET_4_20250514_V1_0",
  "kiroAgent.trustedCommands": [
    "pnpm type-check",
    "pnpm build",
    "pnpm lint",
    "find . -name \"*.d.ts\" -not -path \"./node_modules/*\" -not -path \"./types/*\"",
    "pnpm dev",
    "npm run build",
    "npm run dev",
    "pnpm run build",
    "pnpm run dev"
  ],
}
Some of these settings depend on extensions. For example, the Atom One Dark theme needs its corresponding theme extension, and formatting with prettier requires the Prettier extension to be installed.
Kiro’s two working modes
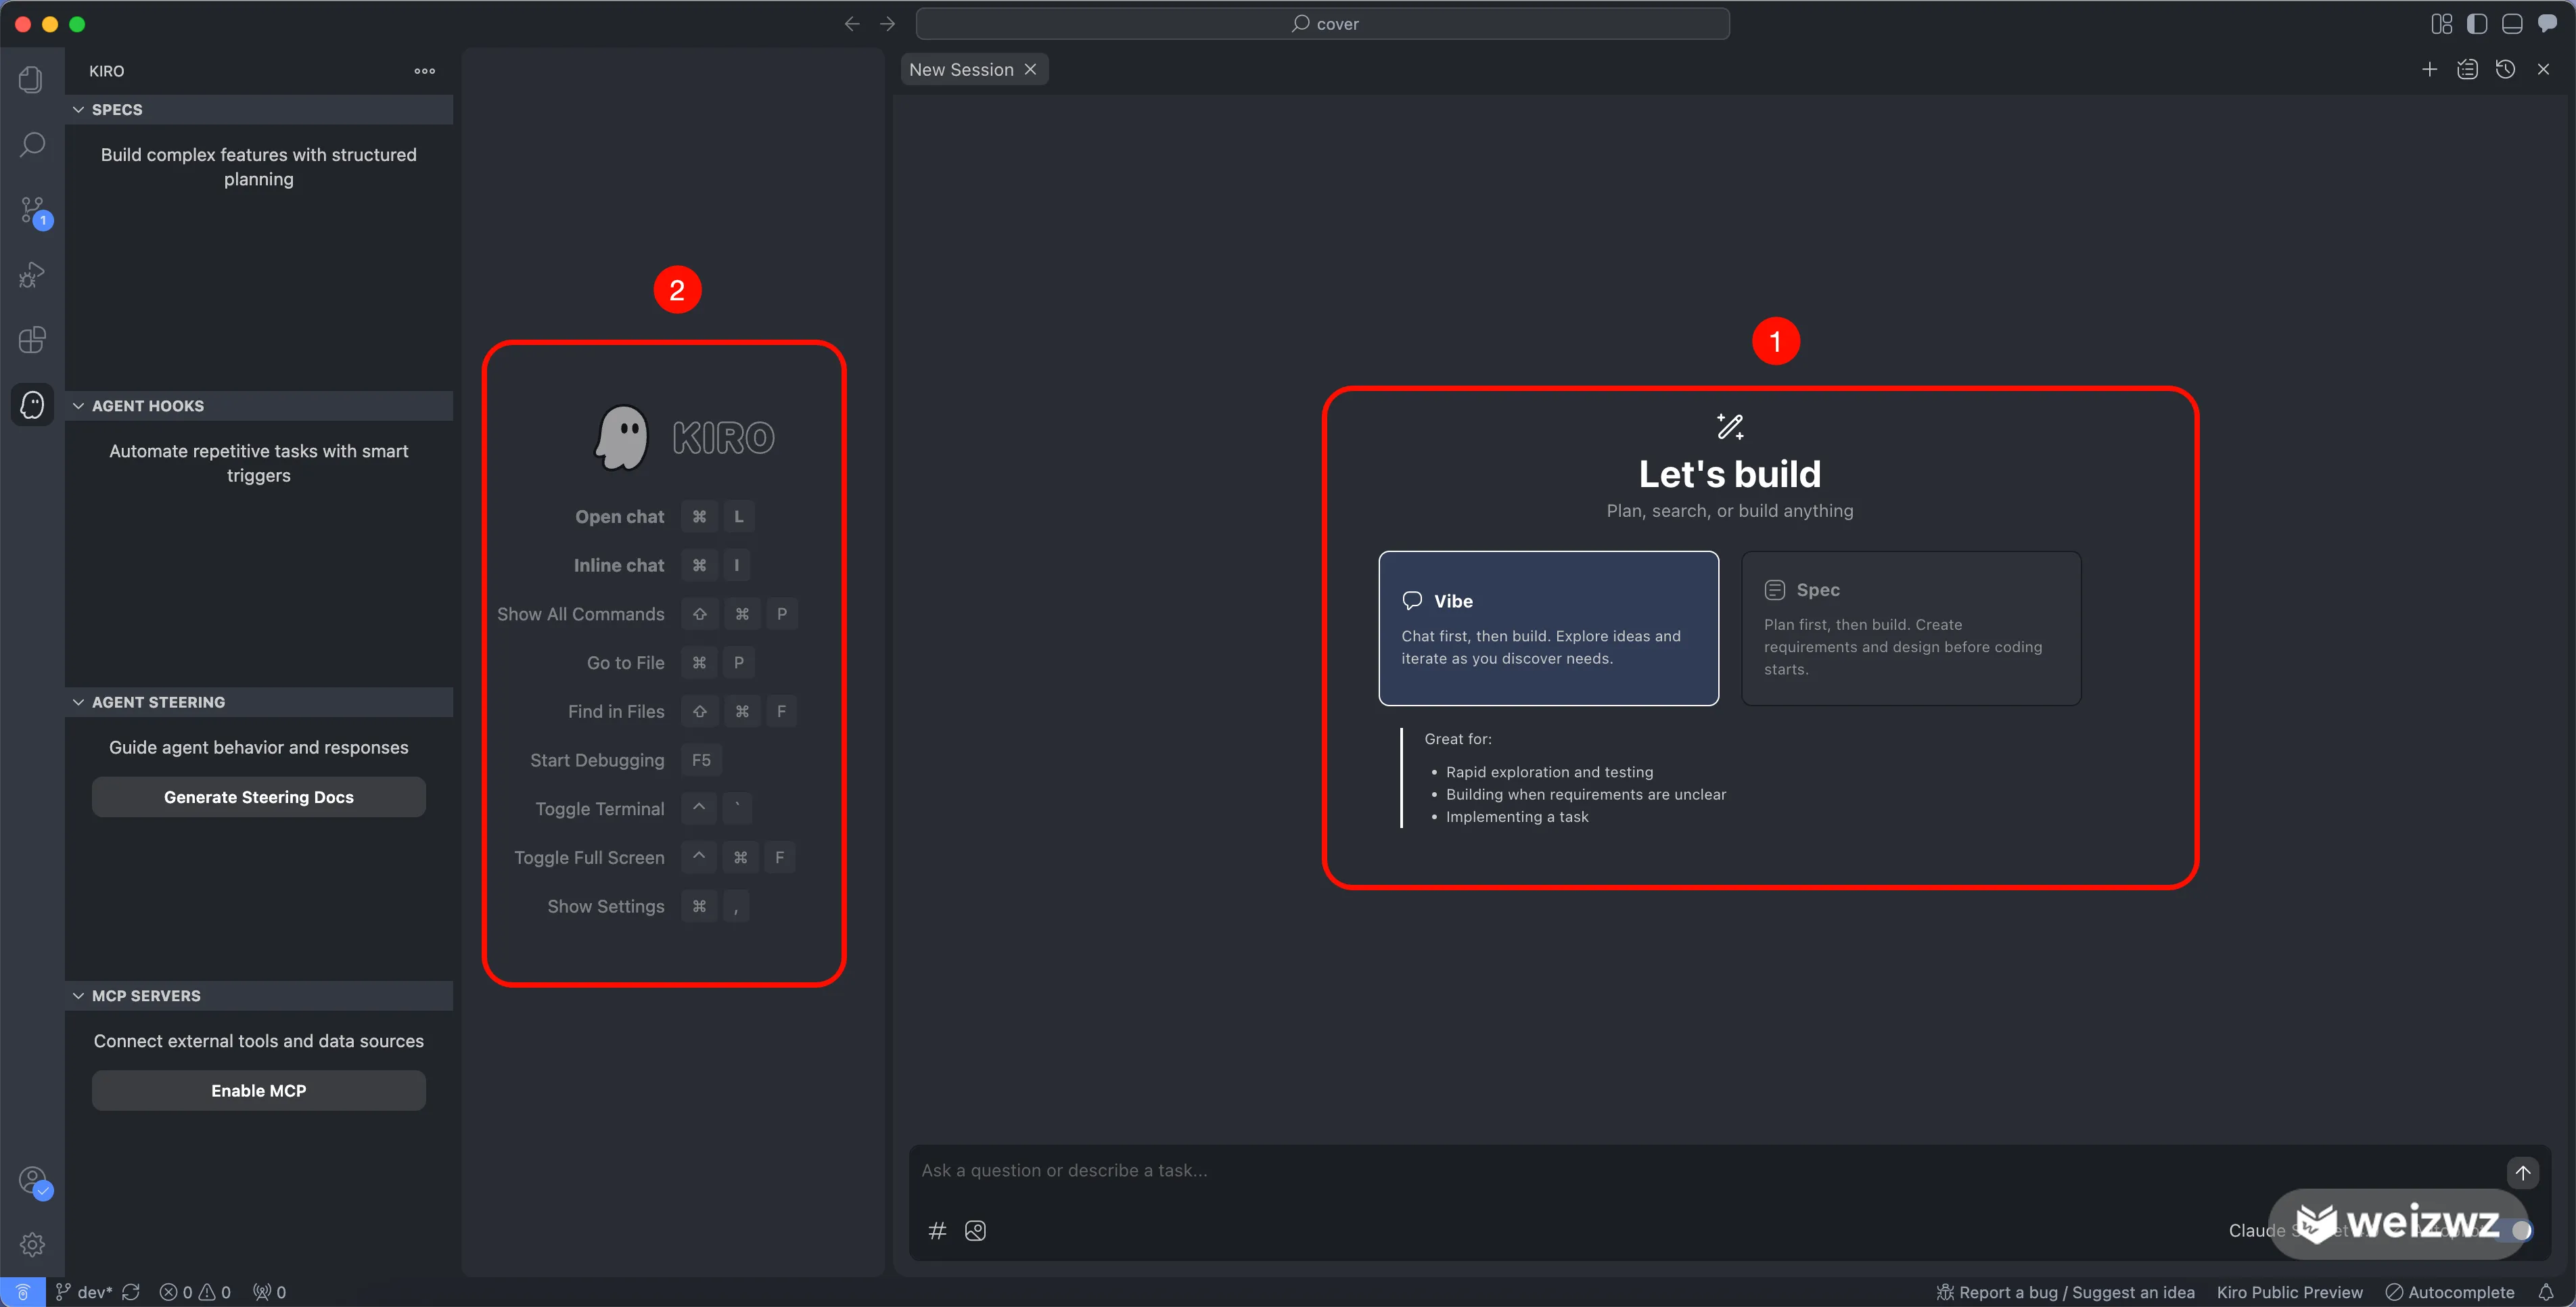
Kiro provides two modes, shown at 1 in the screenshot: vibe and spec.
vibe mode feels close to the way Cursor works. You give instructions while the editor modifies the code. If something goes wrong, you can interrupt the process, point out the problem, and ask it to fix the issue.
spec mode is different. It starts from requirement analysis, helps organize and clarify the request, then generates a requirements document. After that, it moves into product design, produces a task planning document, and only then begins implementation. This mode is an attempt at a more human-like development flow and should be especially useful for full-stack development.
The shortcut for opening Kiro’s chat is shown at 1 in the same screenshot.
Allowing command execution
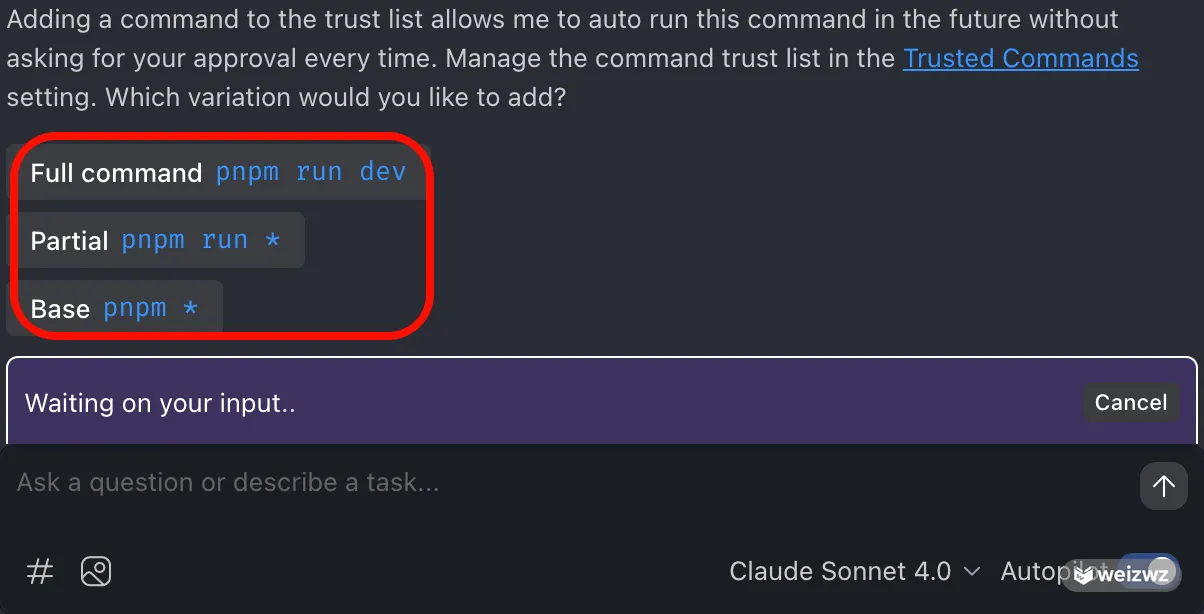
When using Kiro for the first time, commands that need to be executed will pause and wait for your approval. You need to allow them manually. If you frequently run the same kind of command, you can add it to the trusted command list so Kiro can execute it automatically in the future.
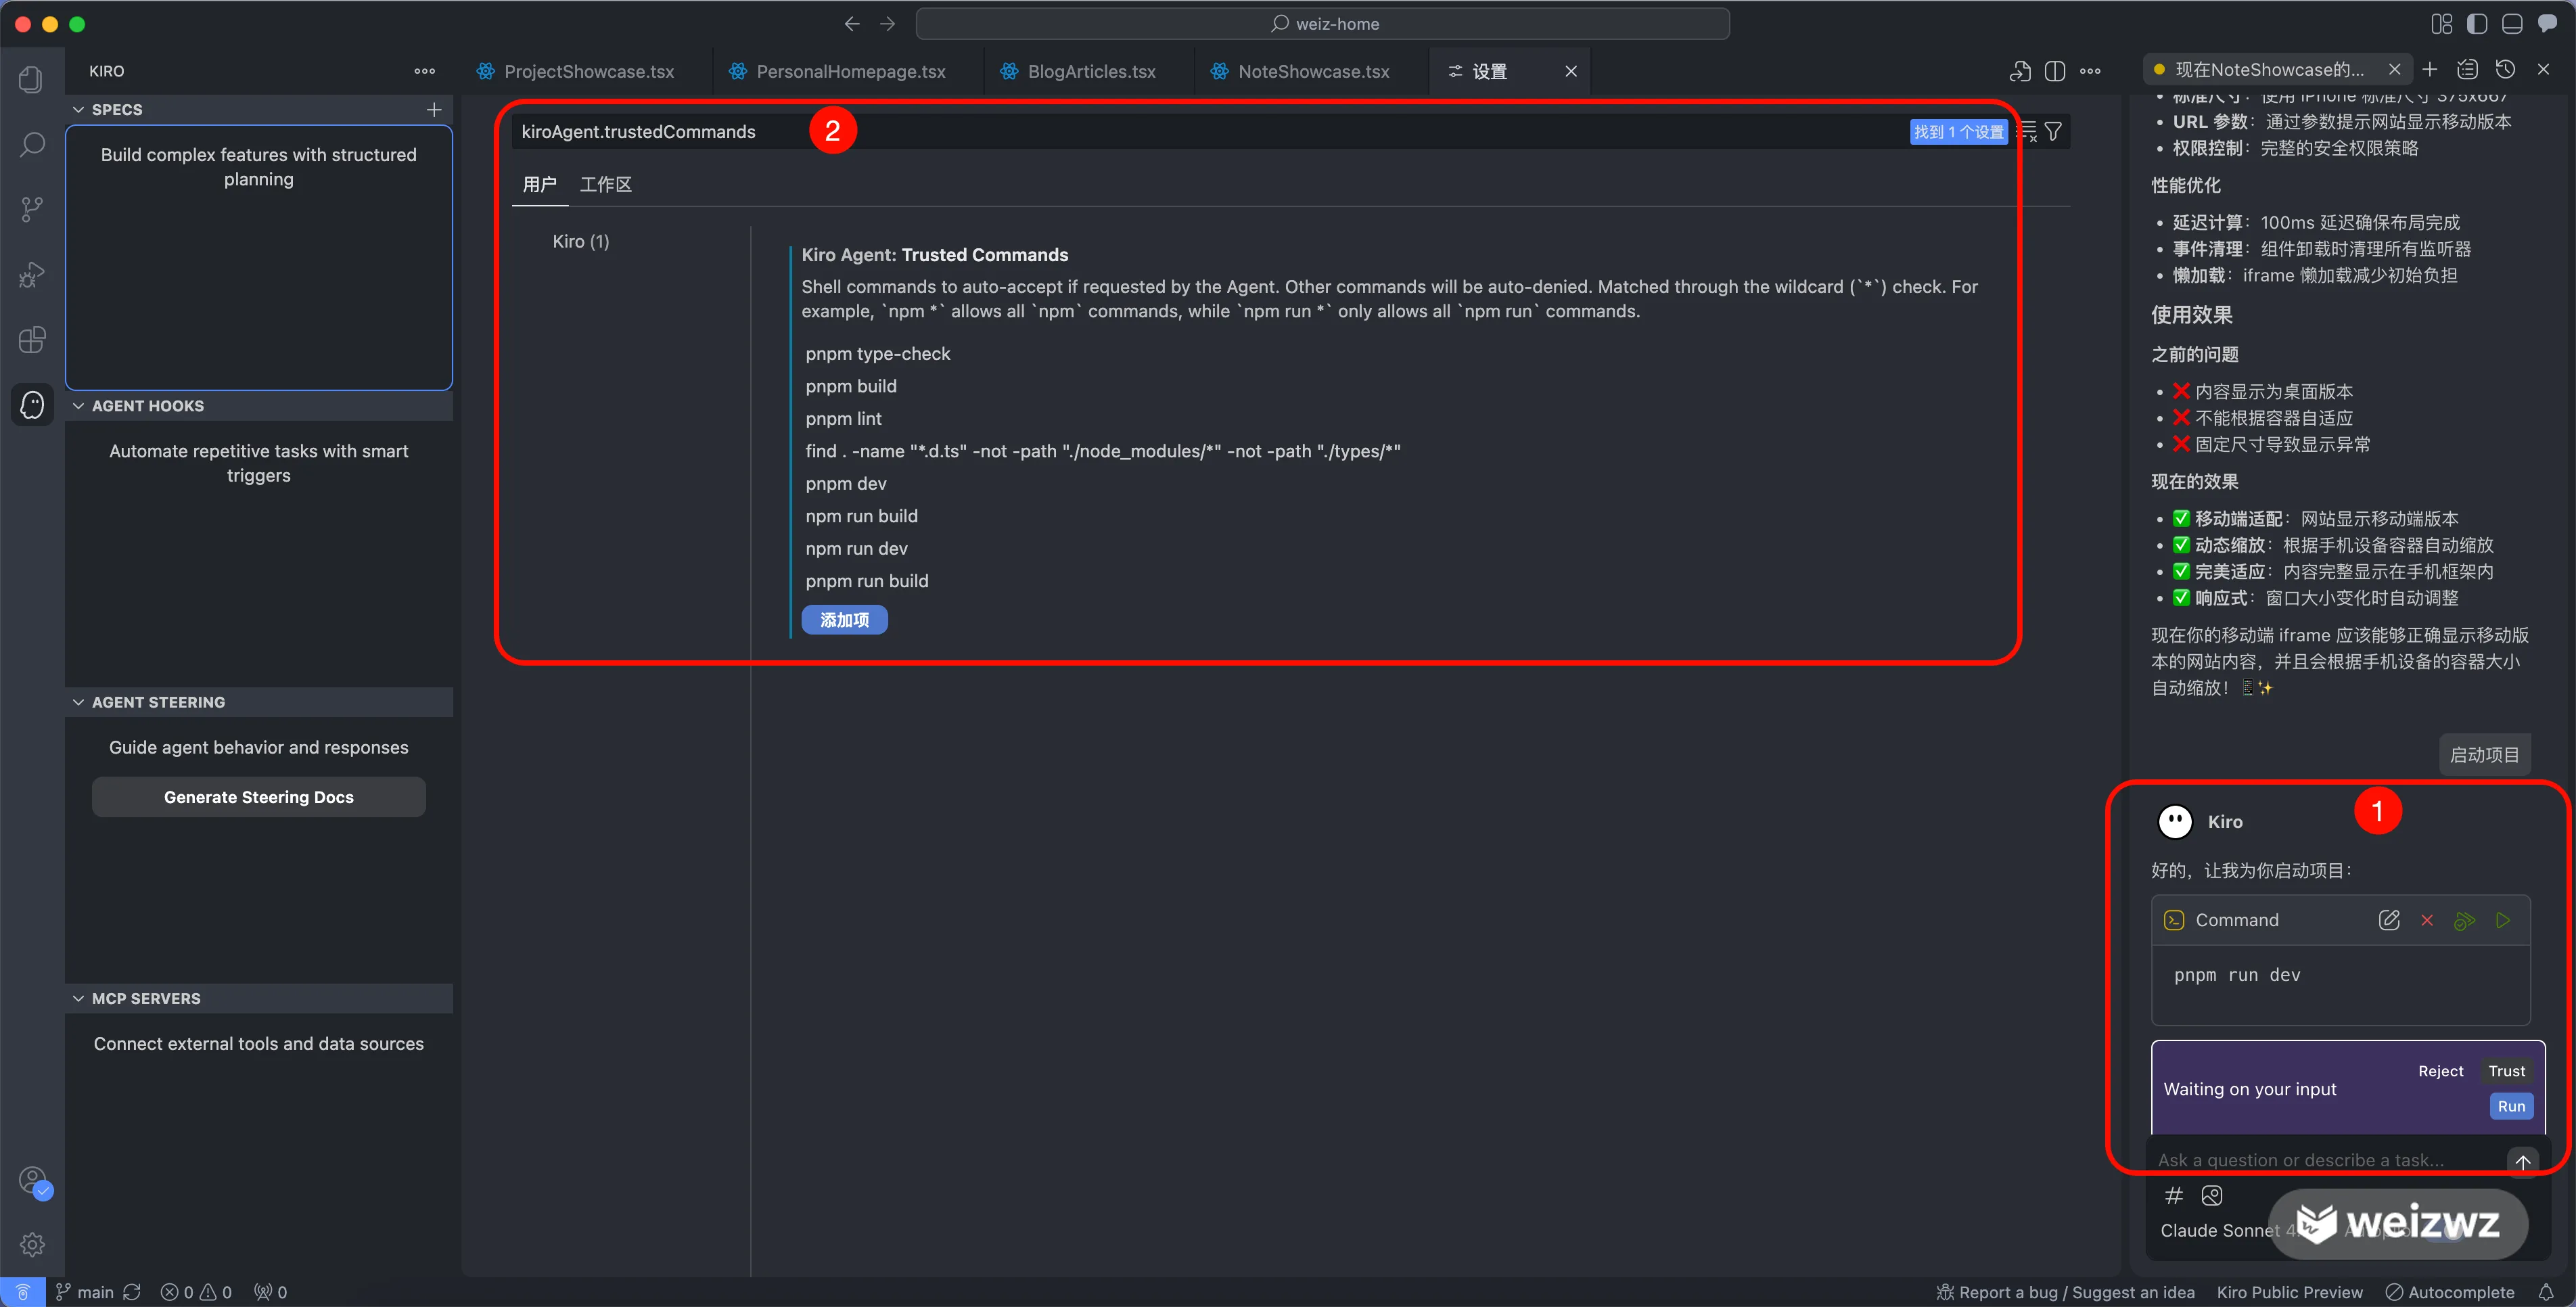
As shown at 2 in the screenshot, search for kiroAgent.trustedCommands in Settings and add commands directly to the trusted list.
At 1 in the screenshot, clicking Run executes the command once. If you click Trust, another confirmation step appears. You then need to choose whether to trust the exact full command or commands of the same type. The command will start running only after you make that choice.