The first WordPress deployment put both containers into a single Pod. That works as a starting point, but it quickly becomes clear that it is not a practical structure for production use.
This version improves the design by splitting the two containers apart and deploying WordPress and MySQL separately.
WordPress can be made highly available by running multiple replicas. MySQL is different because it is a stateful application and is usually managed with a StatefulSet. In this case, though, the database is not running as a cluster and only uses a single replica, so a Deployment is still acceptable. In a real production environment, MySQL is more commonly deployed as a cluster, often with the database instances arranged directly on hosts.
MySQL resources
A Service is added in front of MySQL because WordPress now needs to connect to the database across Pods. In the previous layout, both containers lived in the same Pod and localhost was enough. After splitting them, the database must be reached through the Service DNS name.
Create the resources below directly.
mysql.yaml
apiVersion: v1
kind: Service
metadata:
  name: wordpress-mysql
  namespace: kube-example
  labels:
    app: wordpress
spec:
  selector:
    app: wordpress
    tier: mysql
  ports:
    - port: 3306
      targetPort: dbport
---
apiVersion: apps/v1
kind: Deployment
metadata:
  name: wordpress-mysql
  namespace: kube-example
  labels:
    app: wordpress
    tier: mysql
spec:
  replicas: 1
  template:
    metadata:
      name: wordpress-mysql
      labels:
        app: wordpress
        tier: mysql
    spec:
      containers:
        - name: mysql
          image: mysql:5.7
          args:
            - --default_authentication_plugin=mysql_native_password
            - --character-set-server=utf8mb4
            - --collation-server=utf8mb4_unicode_ci
          ports:
            - containerPort: 3306
              name: dbport
          env:
            - name: MYSQL_ROOT_PASSWORD
              value: rootPassW0rd
            - name: MYSQL_DATABASE
              value: wordpress
            - name: MYSQL_USER
              value: wordpress
            - name: MYSQL_PASSWORD
              value: wordpress
          imagePullPolicy: IfNotPresent
      restartPolicy: Always
  selector:
    matchLabels:
      app: wordpress
      tier: mysql
# kubectl apply -f mysql.yaml
service/wordpress-mysql created
deployment.apps/wordpress-mysql created
WordPress resources
wordpress.yaml
apiVersion: v1
kind: Service
metadata:
  name: wordpress
  namespace: kube-example
spec:
  selector:
    app: wordpress
    tier: frontend
  ports:
    - port: 80
      name: web
      targetPort: wdport
  type: NodePort
---
apiVersion: apps/v1
kind: Deployment
metadata:
  name: wordpress
  namespace: kube-example
  labels:
    app: wordpress
    tier: frontend
spec:
  selector:
    matchLabels:
      app: wordpress
      tier: frontend
  replicas: 4
  template:
    metadata:
      name: wordpress
      labels:
        app: wordpress
        tier: frontend
    spec:
      containers:
        - name: wordpress
          image: wordpress:5.3.2-apache
          ports:
            - containerPort: 80
              name: wdport
          env:
            - name: WORDPRESS_DB_HOST
              value: wordpress-mysql:3306
            - name: WORDPRESS_DB_USER
              value: wordpress
            - name: WORDPRESS_DB_PASSWORD
              value: wordpress
          imagePullPolicy: IfNotPresent
      restartPolicy: Always
The important change here is WORDPRESS_DB_HOST. It no longer points to localhost; it now uses the MySQL Service address. The full DNS name would be wordpress-mysql.kube-example.svc.cluster.local:3306, but because both workloads are in the same namespace, the shorter wordpress-mysql:3306 works as well.
[root@k8s-master1 v2]# kubectl apply -f wordpress.yaml
service/wordpress created
deployment.apps/wordpress created
[root@k8s-master1 v2]# kubectl get pods -l app=wordpress -n kube-example
NAME                           READY   STATUS    RESTARTS   AGE
wordpress-ddb4ff6cf-g2xf8      1/1     Running   0          9s
wordpress-ddb4ff6cf-jjt5k      1/1     Running   0          9s
wordpress-ddb4ff6cf-zmbc4      1/1     Running   0          9s
wordpress-mysql-d9b4b8985-bqv2b   1/1     Running   0          32s
Verifying the deployment
Once everything is in the Running state, the simplest check is to access the WordPress service itself. The service is still exposed with NodePort.
[root@k8s-master1 v2]# kubectl get svc,ep -n kube-example
NAME                  TYPE        CLUSTER-IP    EXTERNAL-IP   PORT(S)        AGE
service/wordpress     NodePort    10.0.0.49    <none>        80:30455/TCP   92s
service/wordpress-mysql   ClusterIP   10.0.0.142   <none>        3306/TCP       115s

NAME                     ENDPOINTS                                 AGE
endpoints/wordpress      10.244.0.5:80,10.244.1.135:80,10.244.1.136:80   92s
endpoints/wordpress-mysql   10.244.1.134:3306                         115s
The wordpress service has been assigned a NodePort, so the application can be opened in a browser through a node IP and that port. If WordPress redirects to the installation page, the deployment is working correctly. If it does not, the next step is to inspect Pod logs and troubleshoot from there.
Follow the page prompts, fill in the required information, click installation, and the site should come up normally.
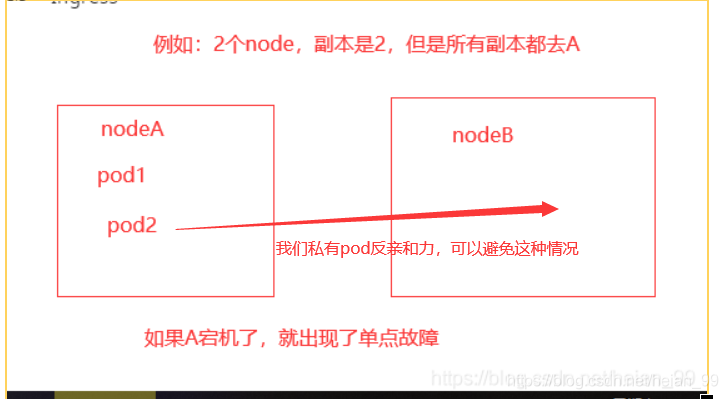
Why multiple replicas alone are not enough
Avoiding a single point of failure is not just about increasing the replica count.
If replicas=1, the service clearly has a single point of failure. But even when the replica count is greater than 1, the same risk still exists if every WordPress Pod gets scheduled onto the same node.
If that node goes down, all replicas disappear at once. So the solution is not only to run multiple Pods, but also to spread them across different nodes.
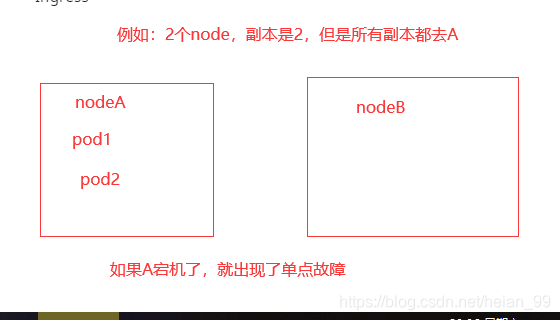
Pod anti-affinity is a practical way to do that.
There is also an important choice to make: use a soft policy or a hard policy.
A soft policy is safer to start with. If a hard policy is used and the cluster cannot satisfy the scheduling rule, the Pod will not be created.
Here is the adjusted WordPress manifest using anti-affinity:
apiVersion: v1
kind: Service
metadata:
  name: wordpress
  namespace: kube-example
spec:
  selector:
    app: wordpress
    tier: frontend
  ports:
    - port: 80
      name: web
      targetPort: wdport
  type: ClusterIP
---
apiVersion: apps/v1
kind: Deployment
metadata:
  name: wordpress
  namespace: kube-example
  labels:
    app: wordpress
    tier: frontend
spec:
  selector:
    matchLabels:
      app: wordpress
      tier: frontend
  replicas: 4
  #多副本+pod的反亲合力可以实现pod的高可用
  template:
    metadata:
      name: wordpress
      labels:
        app: wordpress
        tier: frontend
    spec:
      containers:
        - name: wordpress
          image: wordpress:5.3.2-apache
          ports:
            - containerPort: 80
              name: wdport
          env:
            - name: WORDPRESS_DB_HOST
              value: wordpress-mysql:3306
            - name: WORDPRESS_DB_USER
              value: wordpress
            - name: WORDPRESS_DB_PASSWORD
              value: wordpress
          imagePullPolicy: IfNotPresent
      affinity:
        #pod的反亲和力
        podAffinity:
          preferredDuringSchedulingIgnoredDuringExecution:
            - weight: 1
              podAffinityTerm:
                topologyKey: kubernetes.io/hostname
                labelSelector:
                  matchExpressions:
                    - key: app
                      operator: In
                      values:
                        - wordpress
      restartPolicy: Always
With multiple replicas and pod anti-affinity, WordPress becomes much less vulnerable to node-level failure.
Adding a PodDisruptionBudget
A PodDisruptionBudget limits how many Pods can be disrupted at the same time, which helps preserve service availability during cluster maintenance.
This matters during operations such as kernel upgrades. Before maintaining a node, the usual process is to mark it unschedulable so that no new Pods land on it, then evict or delete the existing Pods. The ReplicaSet notices the missing Pods and recreates them on other nodes.
That process is delete first, then create. It is not a rolling update.
Because of that, if all replicas of a service happen to be disrupted at once, the service may go offline. Anti-affinity and multiple replicas reduce the chance that all Pods sit on a single node, but they do not prevent a broader disruption where several nodes are drained at the same time.
A PDB helps here. For example, if the WordPress application is allowed to have at most one unavailable replica during eviction, Kubernetes will protect the workload from losing all instances at once.
pdb.yaml
apiVersion: policy/v1beta1
kind: PodDisruptionBudget
metadata:
  name: wordpress-pdb
  namespace: kube-example
spec:
  maxUnavailable: 1
  selector:
    matchLabels:
      app: wordpress
      tier: frontend
[root@k8s-master1 v2]# kubectl apply -f pdb.yaml
poddisruptionbudget.policy/wordpress-pdb created
[root@k8s-master1 v2]# kubectl get pdb -n kube-example
NAME            MIN AVAILABLE   MAX UNAVAILABLE   ALLOWED DISRUPTIONS   AGE
wordpress-pdb   N/A             1                 1                     15s
More details about PDB behavior are available in the official Kubernetes documentation:
https://kubernetes.io/docs/tasks/run-application/configure-pdb/
What is still missing
This version achieves high availability for the application tier, but it still leaves several important production concerns unresolved:
- Pod health checks. Without them, restart behavior cannot be relied on properly.
- CPU and memory limits, along with QoS considerations.
- Data persistence.
- Better handling of MySQL credentials and secret injection.
These issues need to be addressed in the next iterations of the architecture.