Why Velero matters in a cloud-native environment
As cloud platforms and containerized workloads keep expanding, Kubernetes has become the default control plane for orchestrating applications. But once clusters start carrying real business workloads, backup and migration stop being optional operational tasks. Protecting Kubernetes resources, recovering from failure, and moving workloads between environments all become difficult if there is no reliable mechanism in place.
Velero is designed for exactly this layer of protection. It is a cloud-native backup, disaster recovery, and migration tool for Kubernetes, and it offers a practical way to safeguard cluster state in day-to-day operations.
Environment used here
The walkthrough below is based on a common Kubernetes setup:
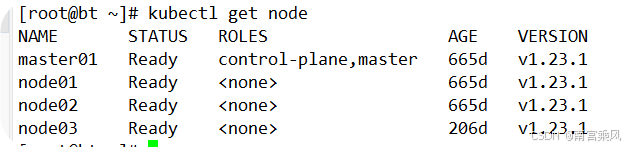
- Kubernetes: v1.23.1
- Velero: 1.11
Project repository: https://github.com/vmware-tanzu/velero
Documentation: https://velero.io/docs/v1.11/
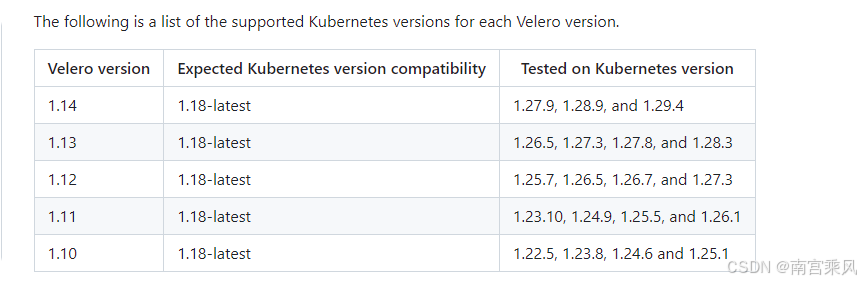
Supported version matrix:
Velero architecture at a glance
Velero is split into two parts:
- Server side: runs inside the Kubernetes cluster
- Client side: a local CLI used from a machine that already has
kubectland a validkubeconfig
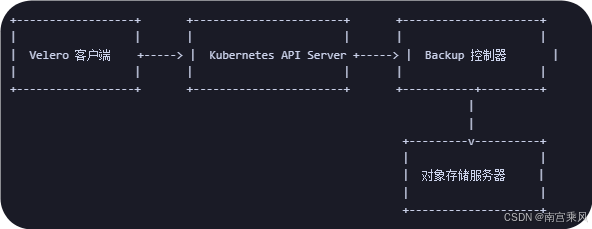
How a backup request flows through Velero
A Velero backup is not a simple file copy. The process involves Kubernetes APIs, controllers, and backend object storage:
- Velero client
Sends an API request to the Kubernetes API Server to create a backup task. - Kubernetes API Server
Accepts and processes the request, creates the backup object, and notifies controllers through the watch mechanism. - Backup controller
Watches the API Server, detects the backup request, and asks the API Server for the resources that need to be backed up. - Object storage
The controller writes the collected backup data to the configured object storage backend.

Backend storage options in Velero
Velero uses two CRDs to describe where data should be stored:
BackupStorageLocationVolumeSnapshotLocation
BackupStorageLocation
BackupStorageLocation defines where Kubernetes cluster resource backups are stored. This covers cluster object data rather than the actual contents of persistent volumes. In practice, this storage is often an S3-compatible object store such as MinIO or Alibaba Cloud OSS.
VolumeSnapshotLocation
VolumeSnapshotLocation is used for PV snapshot backups. This depends on a storage plugin provided by the underlying cloud platform. Alibaba Cloud already offers such a plugin, and snapshots can also be handled through CSI.
If snapshot-based backup is not the desired path, Velero can also work with Restic to back up PV data to object storage such as Alibaba Cloud OSS. This can be enabled during Velero installation.
Restic is a backup tool written in Go with encryption support. It can encrypt local data before sending it to a target repository. Supported repository types include Local, SFTP, Aws S3, Minio, OpenStack Swift, Backblaze B2, Azure BS, Google Cloud storage, and Rest Server.
Installing the Velero client
Download the CLI package for the version that matches the cluster and Velero deployment. In this example, the client version is v1.11.1.
Release list: https://github.com/vmware-tanzu/velero/releases
Install the binary
<table> <thead> <tr> <th>1 2 3 4 5 6 7</th>
<th>$ wget https://github.com/vmware-tanzu/velero/releases/download/v1.11.1/velero-v1.11.1-linux-amd64.tar.gz $ tar zxf velero-v1.11.1-linux-amd64.tar.gz $ mv velero-v1.11.1-linux-amd64/velero /usr/bin/ $ velero -h # 启用命令补全 $ source <(velero completion bash) $ velero completion bash > /etc/bash_completion.d/velero</th>
</tr>
</thead>
<tbody>
<tr>
<td></td>
<td></td>
</tr>
</tbody>
</table>
Preparing MinIO as S3-compatible object storage
Velero supports multiple storage plugins. In this setup, MinIO is used as the S3-compatible backend. MinIO can run inside the Kubernetes cluster or somewhere else, as long as the cluster can reach it.
minio.yaml
1 2 3 4 5 6 7 8 9 10 11 12 13 14 15 16 17 18 19 20 21 22 23 24 25 26 27 28 29 30 31 32 33 34 35 36 37 38 39 40 41 42 43 44 45 46 47 48 49 50 51 52 53 54 55 56 57 58 59 60 61 62 63 64 65 66 67 68 69 70 71 72 73 74 75 76 77 78 79 80 81 82 83 84 85 86 87 88 89 90 91 92 93 94 95 96 97 98 99 100 101 102 103 104 105</th>
<th>--- apiVersion: v1 kind: Namespace metadata: name: velero --- apiVersion: apps/v1 kind: Deployment metadata: namespace: velero name: minio labels: component: minio spec: strategy: type: Recreate selector: matchLabels: component: minio template: metadata: labels: component: minio spec: volumes: - name: storage emptyDir: {} - name: config emptyDir: {} containers: - name: minio image: minio/minio:latest imagePullPolicy: IfNotPresent args: - server - /storage - --config-dir=/config - --console-address=:9001 env: - name: MINIO_ACCESS_KEY value: "minio" - name: MINIO_SECRET_KEY value: "minio123" ports: - containerPort: 9000 volumeMounts: - name: storage mountPath: "/storage" - name: config mountPath: "/config" --- apiVersion: v1 kind: Service metadata: namespace: velero name: minio labels: component: minio spec: # ClusterIP is recommended for production environments. # Change to NodePort if needed per documentation, # but only if you run Minio in a test/trial environment, for example with Minikube. type: NodePort ports: - name: api port: 9000 targetPort: 9000 nodePort: 32000 - name: console port: 9001 targetPort: 9001 nodePort: 32001 selector: component: minio --- apiVersion: batch/v1 kind: Job metadata: namespace: velero name: minio-setup labels: component: minio spec: template: metadata: name: minio-setup spec: restartPolicy: OnFailure volumes: - name: config emptyDir: {} containers: - name: mc image: minio/mc:latest imagePullPolicy: IfNotPresent command: - /bin/sh - -c - "mc --config-dir=/config config host add velero http://minio:9000 minio minio123 && mc --config-dir=/config mb -p velero/velero" volumeMounts: - name: config mountPath: "/config"</th>
</tr>
</thead>
<tbody>
<tr>
<td></td>
<td></td>
</tr>
</tbody>
</table>
Create the MinIO application
<table> <thead> <tr> <th>1 2 3 4 5 6 7 8 9 10 11 12 13 14 15 16 17 18 19 20 21 22 23 24 25</th>
<th># 创建velero命名空间 $ kubectl create namespace velero # 创建minio资源 $ kubectl apply -f minio.yaml # 查看部署状态 [root@bt velero]# kubectl get sts,pod,svc -n velero NAME READY STATUS RESTARTS AGE pod/minio-78f994f86c-4t9lw 1/1 Running 0 27h pod/minio-setup-d7vbl 0/1 Completed 4 27h pod/node-agent-6z5mn 1/1 Running 0 27h pod/node-agent-8kjcm 1/1 Running 0 27h pod/node-agent-k8zbk 1/1 Running 0 27h pod/velero-85dd87c457-mz5jm 1/1 Running 0 27h NAME TYPE CLUSTER-IP EXTERNAL-IP PORT(S) AGE service/minio NodePort 172.21.25.69 <none> 9000:32000/TCP,9001:32001/TCP 27h # 开放NodePort端口 $ kubectl patch svc minio -n velero -p '{"spec": {"type": "NodePort"}}' $ kubectl patch svc minio -n velero --type='json' -p='[{"op": "replace", "path": "/spec/ports/0/nodePort", "value":9000},{"op": "replace", "path": "/spec/ports/1/nodePort", "value":9001}]' [root@bt velero]# kubectl get svc -n velero NAME TYPE CLUSTER-IP EXTERNAL-IP PORT(S) AGE minio NodePort 172.21.25.69 <none> 9000:32000/TCP,9001:32001/TCP 27h</th>
</tr>
</thead>
<tbody>
<tr>
<td></td>
<td></td>
</tr>
</tbody>
</table>
To verify the deployment, open the MinIO console in a browser and sign in with:
- username:
minio - password:
minio123
Deploying the Velero server in Kubernetes
The server side can be installed either with the Velero CLI or through Helm. Here, the CLI is used. By default, velero reads the current cluster context from the same configuration used by kubectl, so the machine running the command must already have access to the target cluster.
Create the credential file
Prepare a credentials file in the current directory:
<table> <thead> <tr> <th>1 2 3 4 5</th>
<th>$ cat > credentials-velero <<EOF [default] aws_access_key_id = minio aws_secret_access_key = minio123 EOF</th>
</tr>
</thead>
<tbody>
<tr>
<td></td>
<td></td>
</tr>
</tbody>
</table>
Install Velero into the cluster
Replace the access key and secret key if your MinIO credentials are different. If MinIO is deployed inside the cluster, the installation command can be run as follows:
<table> <thead> <tr> <th>1 2 3 4 5 6 7 8 9 10 11 12 13 14 15 16 17 18 19 20 21 22 23 24 25 26 27 28 29 30 31 32 33 34 35</th>
<th>$ velero install \ --provider aws \ --image velero/velero:v1.11.1 \ --plugins velero/velero-plugin-for-aws:v1.7.1 \ --bucket velero \ --secret-file ./credentials-velero \ --use-node-agent \ --use-volume-snapshots=false \ --namespace velero \ --backup-location-config region=minio,s3ForcePathStyle="true",s3Url=http://minio:9000 \ --wait # 执行install命令后会创建一系列清单,包括CustomResourceDefinition、Namespace、Deployment等。 # velero install .... --dry-run -o yaml > velero_deploy.yaml 如果为私仓,可以通过--dry-run 导出 YAML 文件调整在应用。 # 可使用如下命令查看运行日志 $ kubectl logs deployment/velero -n velero # 查看velero创建的api对象 $ kubectl api-versions | grep velero velero.io/v1 # 查看备份位置 $ velero backup-location get NAME PROVIDER BUCKET/PREFIX PHASE LAST VALIDATED ACCESS MODE DEFAULT default aws velero Available 2024-08-16 14:42:38 +0800 CST ReadWrite true #卸载命令 # velero uninstall --namespace velero You are about to uninstall Velero. Are you sure you want to continue (Y/N)? y Waiting for velero namespace "velero" to be deleted ............................................................................................................................................................................................ Velero namespace "velero" deleted Velero uninstalled ⛵</th>
</tr>
</thead>
<tbody>
<tr>
<td></td>
<td></td>
</tr>
</tbody>
</table>
What the main installation flags mean
--kubeconfig(optional): specifies the authentication file; defaults to.kube/config--provider: selects the plugin provider--image: defines the Velero server image; by default it matches the client version--plugins: specifies the plugin image for AWS S3-compatible storage--bucket: names the object storage bucket--secret-file: points to the credential file for object storage--use-node-agent: creates the Velero Node Agent daemon, which hosts the FSB module--use-volume-snapshots: enables or disables snapshot usage--namespace: chooses the namespace for deployment, defaulting tovelero--backup-location-config: defines endpoint details for the object storage backend
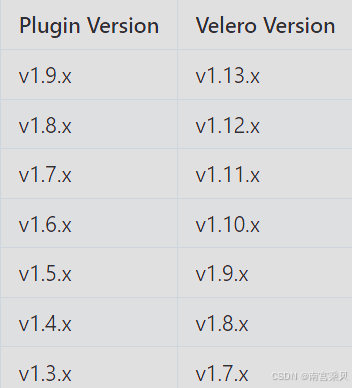
The AWS plugin version must match the Velero release line being used:
Fully uninstalling Velero
If Velero needs to be removed completely, delete the namespace and the CRDs created during installation:
<table> <thead> <tr> <th>1 2</th>
<th>kubectl delete namespace/velero clusterrolebinding/velero kubectl delete crds -l component=velero</th>
</tr>
</thead>
<tbody>
<tr>
<td></td>
<td></td>
</tr>
</tbody>
</table>
Backup and restore operations
The backup command format is:
velero create backup NAME [flags]
Common backup options include:
--exclude-namespaces stringArray: exclude specific namespaces--exclude-resources stringArray: exclude specific resources, such asstorageclasses.storage.k8s.io--include-cluster-resources optionalBool[=true]: include cluster-scoped resource types--include-namespaces stringArray: include specific namespaces; default is*--include-resources stringArray: include specific resources--labels mapStringString: attach labels to the backup-o, --output string: choosetable,json, oryaml-l, --selector labelSelector: back up resources matching labels--snapshot-volumes optionalBool[=true]: create PV snapshots--storage-location string: choose a backup location--ttl duration: define how long the backup is retained--volume-snapshot-locations strings: select the snapshot location or cloud driver
Creating a test workload
A simple official Nginx example is enough to validate backup and restore behavior.
<table> <thead> <tr> <th>1 2 3 4 5 6 7 8 9 10 11 12 13 14 15 16 17 18 19</th>
<th>$ kubectl apply -f examples/nginx-app/base.yaml namespace/nginx-example created deployment.apps/nginx-deployment created service/my-nginx created # 查看资源清单 $ kubectl get all -n nginx-example NAME READY STATUS RESTARTS AGE pod/nginx-deployment-5c844b66c8-t5l9z 1/1 Running 0 27h pod/nginx-deployment-5c844b66c8-vlkqj 1/1 Running 0 27h NAME TYPE CLUSTER-IP EXTERNAL-IP PORT(S) AGE service/my-nginx LoadBalancer 172.21.18.168 192.168.102.51 80:31831/TCP 27h NAME READY UP-TO-DATE AVAILABLE AGE deployment.apps/nginx-deployment 2/2 2 2 27h NAME DESIRED CURRENT READY AGE replicaset.apps/nginx-deployment-5c844b66c8 2 2 2 27h</th>
</tr>
</thead>
<tbody>
<tr>
<td></td>
<td></td>
</tr>
</tbody>
</table>
Backing up the test application
Create a namespace-scoped backup for nginx-example:
1 2 3</th>
<th>$ velero backup create nginx-backup --include-namespaces nginx-example Backup request "nginx-backup" submitted successfully. Run `velero backup describe nginx-backup` or `velero backup logs nginx-backup` for more details.</th>
</tr>
</thead>
<tbody>
<tr>
<td></td>
<td></td>
</tr>
</tbody>
</table>
Useful options here include:
--include-namespaces: limit backup to a given namespace--selector: use a label selector such asapp=nginx
Check the backup result
<table> <thead> <tr> <th>1 2 3 4 5 6 7 8 9 10</th>
<th>$ velero backup get NAME STATUS ERRORS WARNINGS CREATED EXPIRES STORAGE LOCATION SELECTOR nginx-backup Completed 0 0 2024-08-15 11:17:18 +0800 CST 28d default <none> # 查看备份详细信息 $ velero backup describe nginx-backup # 查看备份日志 $ velero backup logs nginx-backup</th>
</tr>
</thead>
<tbody>
<tr>
<td></td>
<td></td>
</tr>
</tbody>
</table>
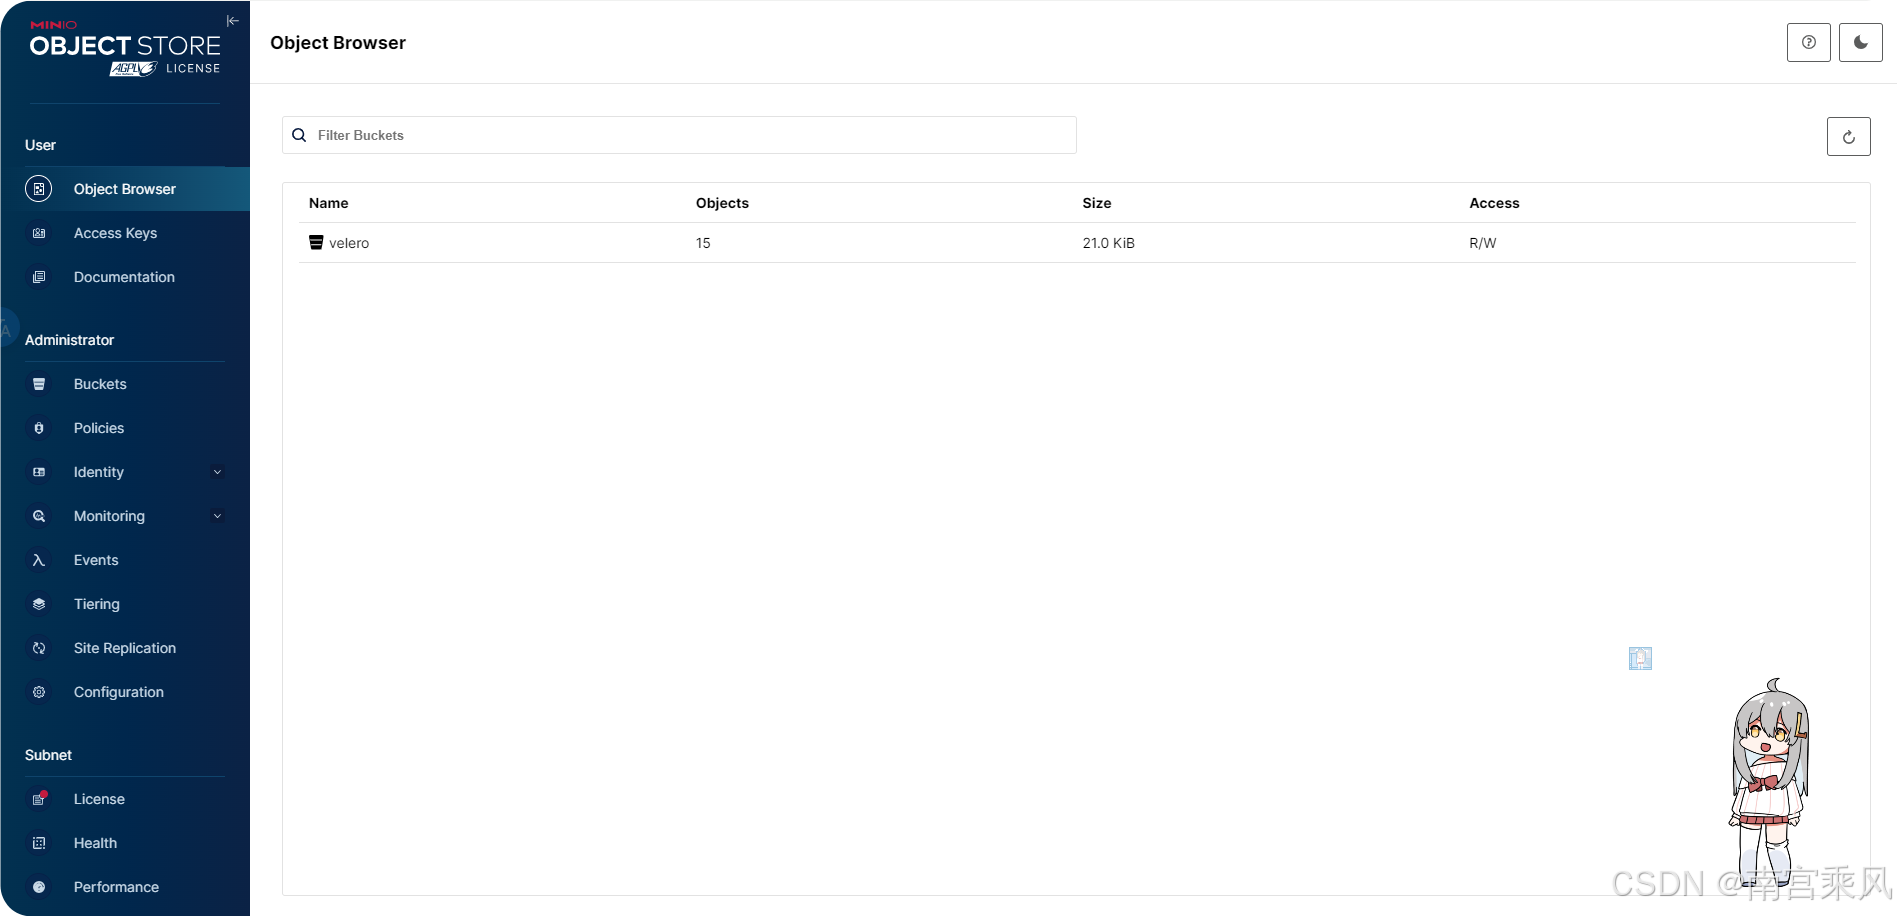
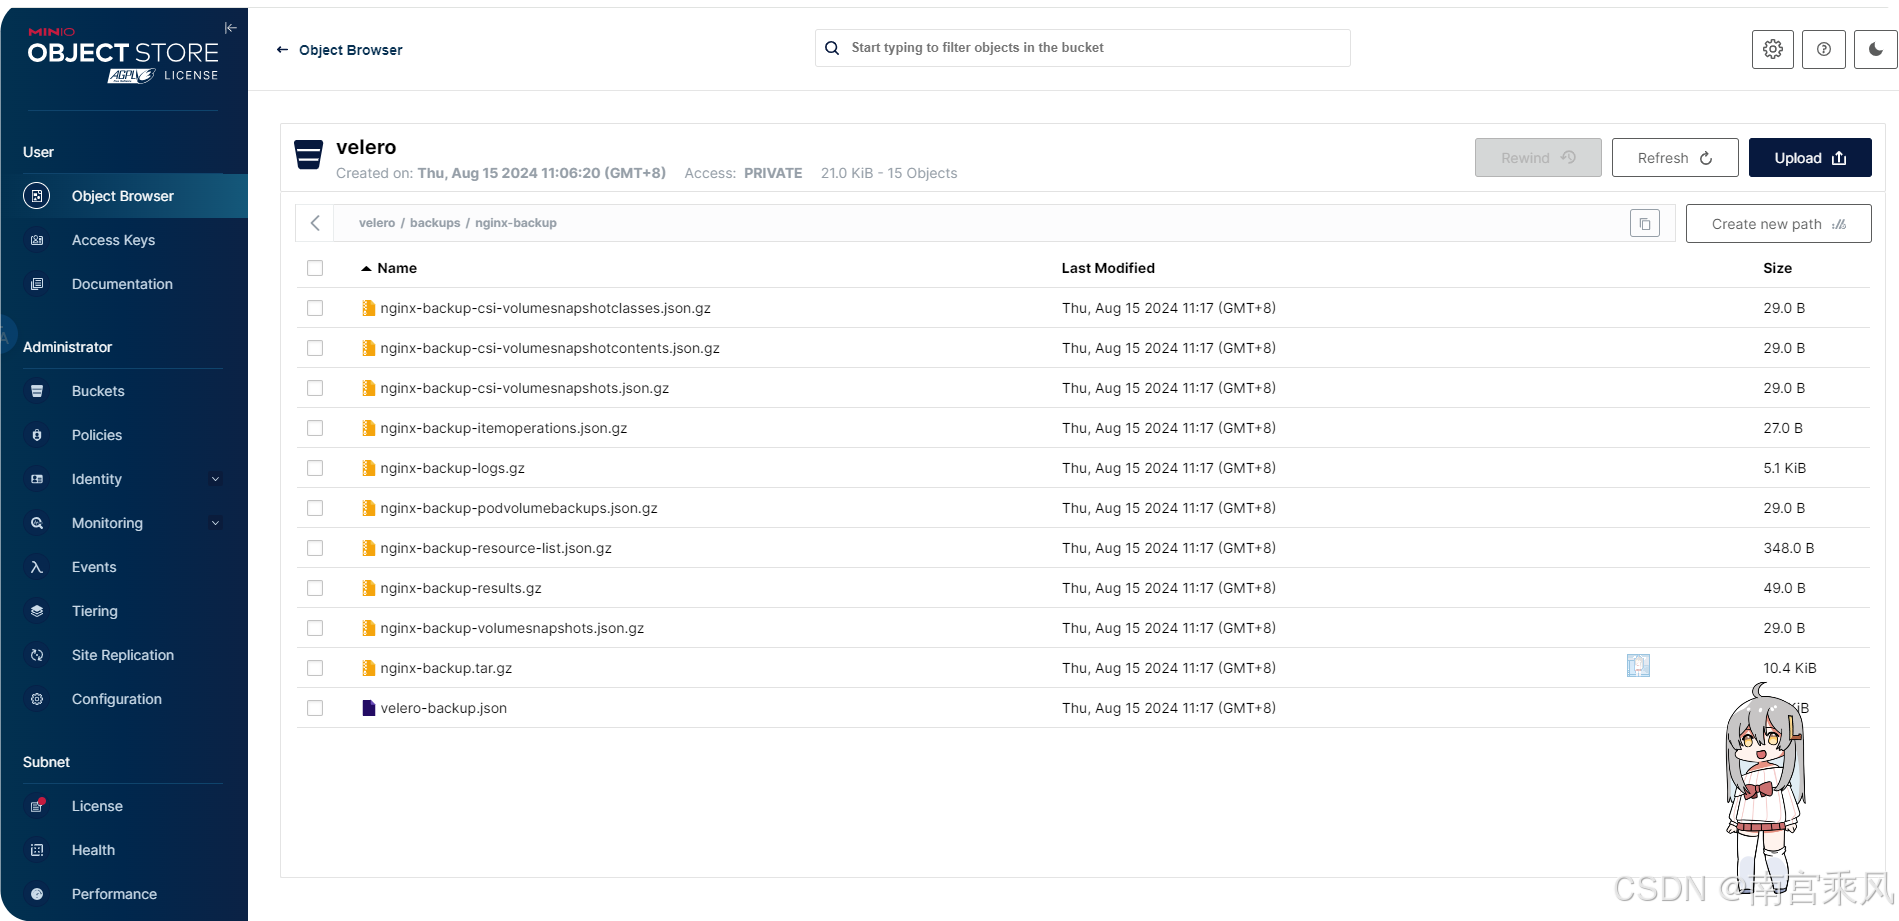
The backup objects can also be verified directly in the MinIO console.
Scheduled backups
Velero also supports recurring backup policies with cron expressions.
<table> <thead> <tr> <th>1 2 3 4 5 6 7 8</th>
<th># 使用cron表达式备份 $ velero schedule create nginx-daily --schedule="0 1 * * *" --include-namespaces nginx-example # 使用一些非标准的速记 cron 表达式 $ velero schedule create nginx-daily --schedule="@daily" --include-namespaces nginx-example # 手动触发定时任务 $ velero backup create --from-schedule nginx-daily</th>
</tr>
</thead>
<tbody>
<tr>
<td></td>
<td></td>
</tr>
</tbody>
</table>
This makes it easy to automate routine protection while still allowing an on-demand run from an existing schedule.
Simulating failure and restoring the application
To test recovery, first remove the workload namespace completely.
Simulate a disaster
<table> <thead> <tr> <th>1 2 3 4 5</th>
<th># 删除nginx-example命名空间和资源 $ kubectl delete namespace nginx-example # 检查是否删除 $ kubectl get all -n nginx-example No resources found in nginx-example namespace.</th>
</tr>
</thead>
<tbody>
<tr>
<td></td>
<td></td>
</tr>
</tbody>
</table>
Restore from the backup
<table> <thead> <tr> <th>1 2 3 4 5 6 7</th>
<th>$ velero backup get NAME STATUS ERRORS WARNINGS CREATED EXPIRES STORAGE LOCATION SELECTOR nginx-backup Completed 0 0 2024-04-06 21:47:16 +0800 CST 29d default <none> $ velero restore create --from-backup nginx-backup Restore request "nginx-backup-20240406215611" submitted successfully. Run `velero restore describe nginx-backup-20240406215611` or `velero restore logs nginx-backup-20240406215611` for more details.</th>
</tr>
</thead>
<tbody>
<tr>
<td></td>
<td></td>
</tr>
</tbody>
</table>
Verify the recovered resources
<table> <thead> <tr> <th>1 2 3 4 5 6 7 8 9 10 11 12 13 14 15 16 17 18 19 20 21</th>
<th>$ velero restore get NAME BACKUP STATUS STARTED COMPLETED ERRORS WARNINGS CREATED SELECTOR nginx-backup-20240406215611 nginx-backup Completed 2024-04-06 21:56:11 +0800 CST 2024-04-06 21:56:12 +0800 CST 0 2 2024-04-06 21:56:11 +0800 CST <none> # 查看详细信息 $ velero restore describe nginx-backup-20240406215611 # 检查资源状态 $ kubectl get all -n nginx-example NAME READY STATUS RESTARTS AGE pod/nginx-deployment-5c844b66c8-t5l9z 1/1 Running 0 27h pod/nginx-deployment-5c844b66c8-vlkqj 1/1 Running 0 27h NAME TYPE CLUSTER-IP EXTERNAL-IP PORT(S) AGE service/my-nginx LoadBalancer 172.21.18.168 192.168.102.51 80:31831/TCP 27h NAME READY UP-TO-DATE AVAILABLE AGE deployment.apps/nginx-deployment 2/2 2 2 27h NAME DESIRED CURRENT READY AGE replicaset.apps/nginx-deployment-5c844b66c8 2 2 2 27h</th>
</tr>
</thead>
<tbody>
<tr>
<td></td>
<td></td>
</tr>
</tbody>
</table>
After restoration, the namespace, deployment, pods, service, and ReplicaSet return to the cluster state recorded in the backup.
In practical Kubernetes operations, this is where Velero shows its value most clearly: not only preserving cluster resources, but also making recovery and migration repeatable instead of improvised.