When a Hexo blog is deployed automatically through Vercel or GitHub Actions, a common annoyance is that every post suddenly appears to have been updated at the time of the latest deployment. In many cases, those posts were not edited at all; only the repository was pushed and rebuilt.
The root cause is not Hexo itself, but the way git handles file metadata. Git does not preserve metadata such as file access time or modification time when files are pushed, cloned, or checked out. After a fresh git clone, the files in the working directory usually receive timestamps from the current system environment rather than their original creation or modification times.
Git’s own explanation is that modification time is important to build tools. Many build tools compare the timestamp of source files with generated files. If the source file is newer, the build runs again; otherwise, the tool can skip work and save time. Git therefore sets the current time on files it modifies and leaves untouched files alone, allowing build systems to behave predictably inside a normal working tree. But once a project is checked out in CI, file timestamps no longer represent the original editing history.
Hexo uses the last modified time of the file as the post’s updated time by default. Only when updated is explicitly defined in the post’s front matter will Hexo use that value instead. That is why CI deployments often make all posts look newly updated: the metadata attached to the checked-out files does not carry over from the repository.
Method 1: Explicitly set updated in front matter
The most direct solution is to add an updated field to every post’s front matter:
title: article title
date: 2023-01-01 00:00:00
# 添加 updated: 更新时间
updated: 2023-01-01 00:00:00
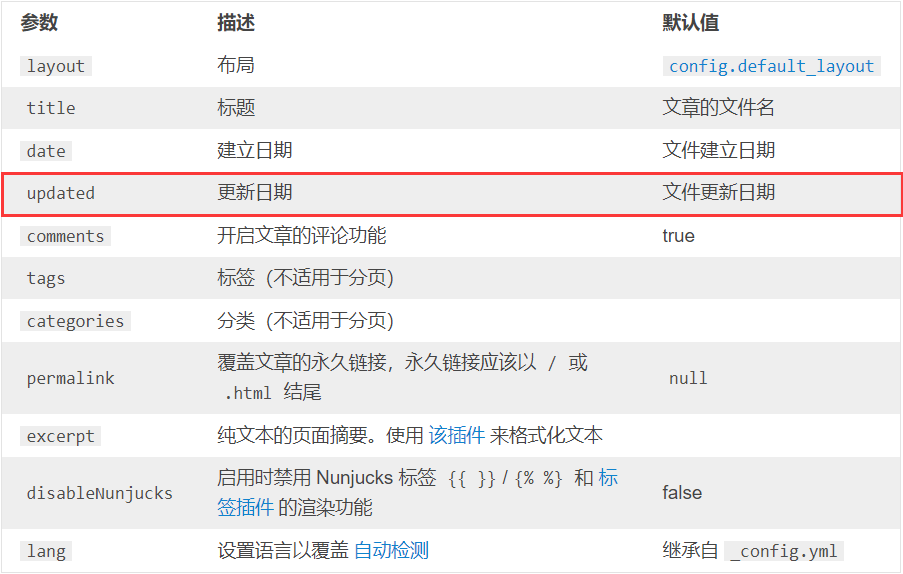
After doing this, Hexo will use the value of updated as the post’s update time. When a post is edited later, only the updated value needs to be changed.
The downside is obvious: every post’s update time has to be maintained manually unless some automation is added.
Automatically update updated with a PowerShell script
One way to reduce manual work is to use a PowerShell script that scans all Markdown posts and writes the last commit time of each file into its updated field.
Create an update.ps1 file in the root directory of the Hexo blog:
$fileEncoding = "UTF8";
Function Convert-FromUnixDate ($UnixDate) {
    [timezone]::CurrentTimeZone.ToLocalTime(([datetime]'1/1/1970').AddSeconds($UnixDate))
}
$fileNum = 0;
Get-ChildItem -Path "./source/_posts" -recurse *.md | ForEach-Object -Process{
    $fileNum = $fileNum + 1;
    if ($_ -is [System.IO.FileInfo]) {
        $filePath = $_.FullName;
        Write-Host('{0}. {1}' -f $fileNum, $filePath);
        $lineNum = 0;
        # yaml 格式占据行数
        $yamlStartEndNum = 0;
        $existUpdated = $false;
        $updatedNum = 0;
        $newstreamreader = New-Object System.IO.StreamReader($filePath);
        while (($readeachline = $newstreamreader.ReadLine()) -ne $null) {
            $lineNum = $lineNum + 1;
            $temp = $readeachline -replace " ","" -replace "\n",""
            if ($temp -match "---") {
                $yamlStartEndNum = $yamlStartEndNum + 1;
            }
            if ($readeachline.Contains("updated:")) {
                $existUpdated = $true;
                $updatedNum = $lineNum;
            }
            if ($yamlStartEndNum -ge 2) {
                # yaml end
                break;
            }
        }
        $newstreamreader.Dispose();
        $filedata = Get-Content -Path $filePath -Encoding $fileEncoding;
        $oldYamlStr = $filedata | Select-Object -First $lineNum
        # git log format: https://www.cnblogs.com/ckAng/p/11205055.html https://git-scm.com/docs/git-log
        # 此文件 最后一次 commit 的 Unix时间戳
        $dateUpdated = git log -1 --format='%ct' $filepath
        $dateUpdated = Convert-FromUnixDate $dateUpdated
        $dateUpdated = $dateUpdated.ToString("yyyy-MM-dd HH:mm:ss");
        $newUpdated = "updated: " + $dateUpdated;
        #Write-Host("newUpdated: " + $newUpdated)
        $newYamlStr = ""
        # 注意: yamlStr 是一个数组, 每一个元素为一行字符串
        $tempOldYamlStr = $oldYamlStr;
        if ($existUpdated) {
            #Write-Host($yamlStr[$updatedNum-1])
            $oldUpdated = $oldYamlStr[$updatedNum-1];
            $tempOldYamlStr[$updatedNum-1] = $oldYamlStr[$updatedNum-1] -replace $oldUpdated,$newUpdated
        }else {
            # 修改 yaml 结束行
            # TODO: 好像取到的这一行不包括 最后的换行符, 导致加一个 换行 反而多了, 不过为了保险, 还是加上一个换行
            $tempOldYamlStr[$lineNum-1] = $newUpdated + $([System.Environment]::NewLine) + "---" + $([System.Environment]::NewLine)
        }
        $newYamlStr = $tempOldYamlStr
        Write-Output $newYamlStr
        $newFiledata = $newYamlStr + $filedata[$lineNum..$filedata.count]
        $newFiledata | Set-Content -Path $filePath -Encoding $fileEncoding
    }
}
#Write-Host("更新 updated 完成");
This script reads the front matter of each Markdown file under ./source/_posts, checks whether updated: already exists, obtains the file’s latest commit timestamp with git log -1 --format='%ct', converts it to local time, and then either replaces or inserts the updated field.
Add updated to the Hexo scaffold
Hexo’s default front matter template does not include updated, so newly created posts will still lack that field unless the scaffold is changed.
Open /scaffolds/post.md in the Hexo root directory and add updated:
title: {{ title }}
date: {{ date }}
# 添加 updated 属性
updated: {{ date }}
tags:
-
categories:
-
New posts created afterward will include updated automatically, using the creation time as the initial value.
Method 2: Change updated_option
Hexo also provides updated_option, which controls how updated is generated when it is not specified in front matter.
Available values include:
mtime: Use the file’s last modification time. This has been Hexo’s default behavior since Hexo 3.0.0.date: Use the post’sdatevalue asupdated. This is useful in Git-based workflows because file modification times often change when the site is managed with Git.empty: Removeupdateddirectly. This may cause many themes and plugins to stop working correctly.
The older use_date_for_updated option has been deprecated and is expected to be removed in a future major version. updated_option: 'date' should be used instead.
To apply this behavior, edit _config.yml in the Hexo root directory:
# 文章的更新时间
updated_option: date
This avoids CI-generated modification times, but it also means every post’s default updated value becomes its creation time rather than its actual last edit time. It is a workaround, not a full fix.
Method 3: Deploy to Vercel through GitHub Actions
For a Hexo blog hosted on Vercel, the more accurate solution is to restore each post file’s modification time before Vercel builds the project.
If Vercel is directly connected to the GitHub repository, every push triggers an automatic build. Since that build process cannot easily be modified from the repository side, the deployment can instead be moved into GitHub Actions. The Action checks out the full Git history, restores Markdown file timestamps based on their latest commit time, builds the project, and deploys it to Vercel manually.
How the timestamp restoration works
The key command is:
# Restore last modified time
- "git ls-files -z | while read -d '' path; do touch -d \"$(git log -1 --format=\"@%ct\" \"$path\")\" \"$path\"; done"
It sets each file’s last modified time to the timestamp of that file’s most recent commit in Git.
For Hexo posts, the same idea can be limited to Markdown files under source/_posts:
find source/_posts -name '*.md' | while read file; do touch -d "$(git log -1 --format="@%ct" "$file")" "$file"; done
After this command runs, Hexo sees each post’s file modification time as the time of its latest Git commit, so the generated updated value becomes much closer to the real post update time.
Stop Vercel from auto-deploying on every push
Before deploying from GitHub Actions, disconnect the Vercel project from the GitHub repository, or disable automatic deployment for the target branch.
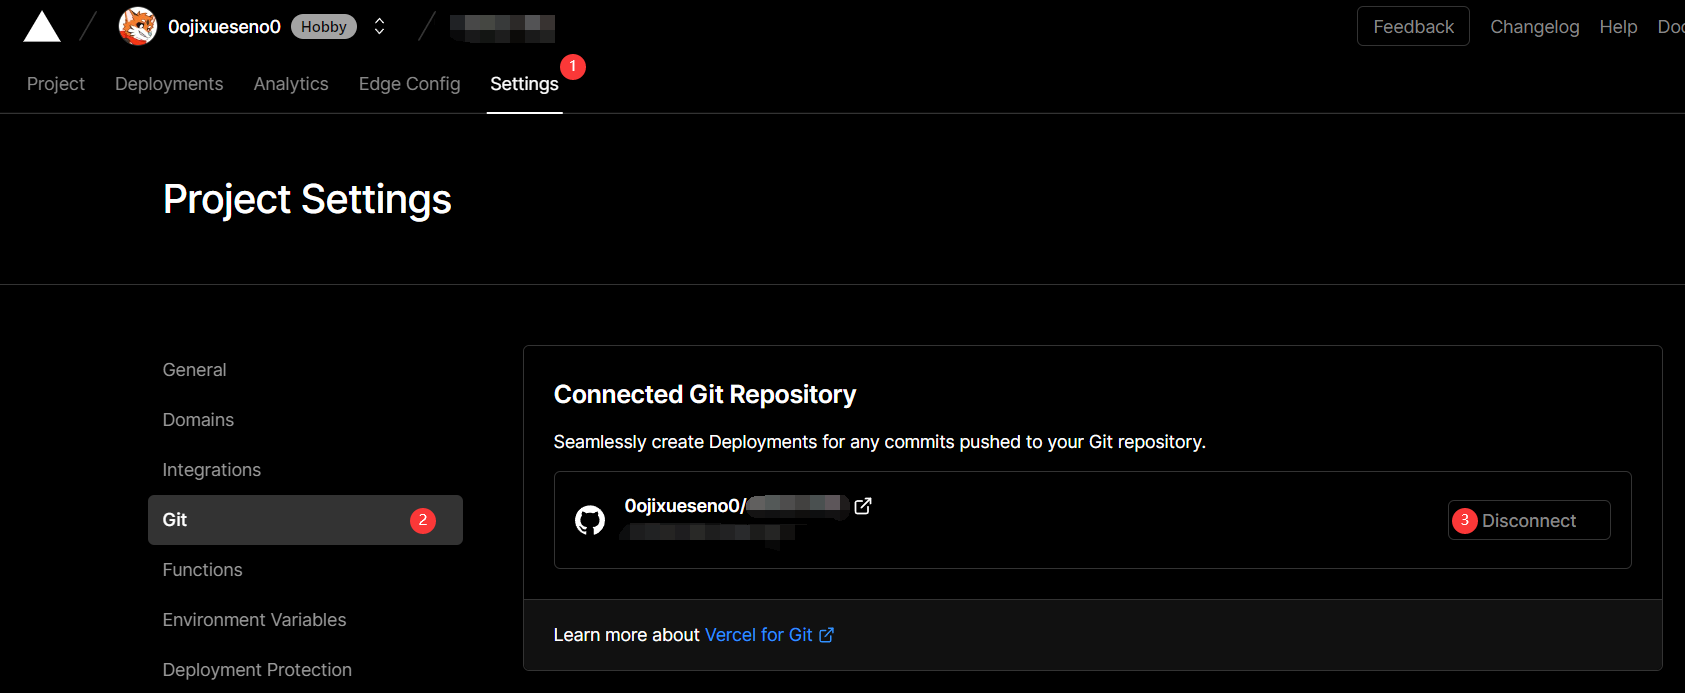
Vercel supports disabling Git-triggered deployments through git.deploymentEnabled. For example, to stop automatic deployments from the main branch, create a vercel.json file in the blog root directory:
{
  "git": {
    "deploymentEnabled": {
      "main": false
    }
  }
}
With this configuration, Vercel will not automatically deploy when the GitHub repository is updated.
Required Vercel credentials
The GitHub Action needs two environment variables and one token:
VERCEL_ORG_IDVERCEL_PROJECT_IDVERCEL_TOKEN
Get a Vercel Access Token
Create a Vercel Access Token in the Vercel account settings. This token will be used by GitHub Actions to deploy the project to Vercel.
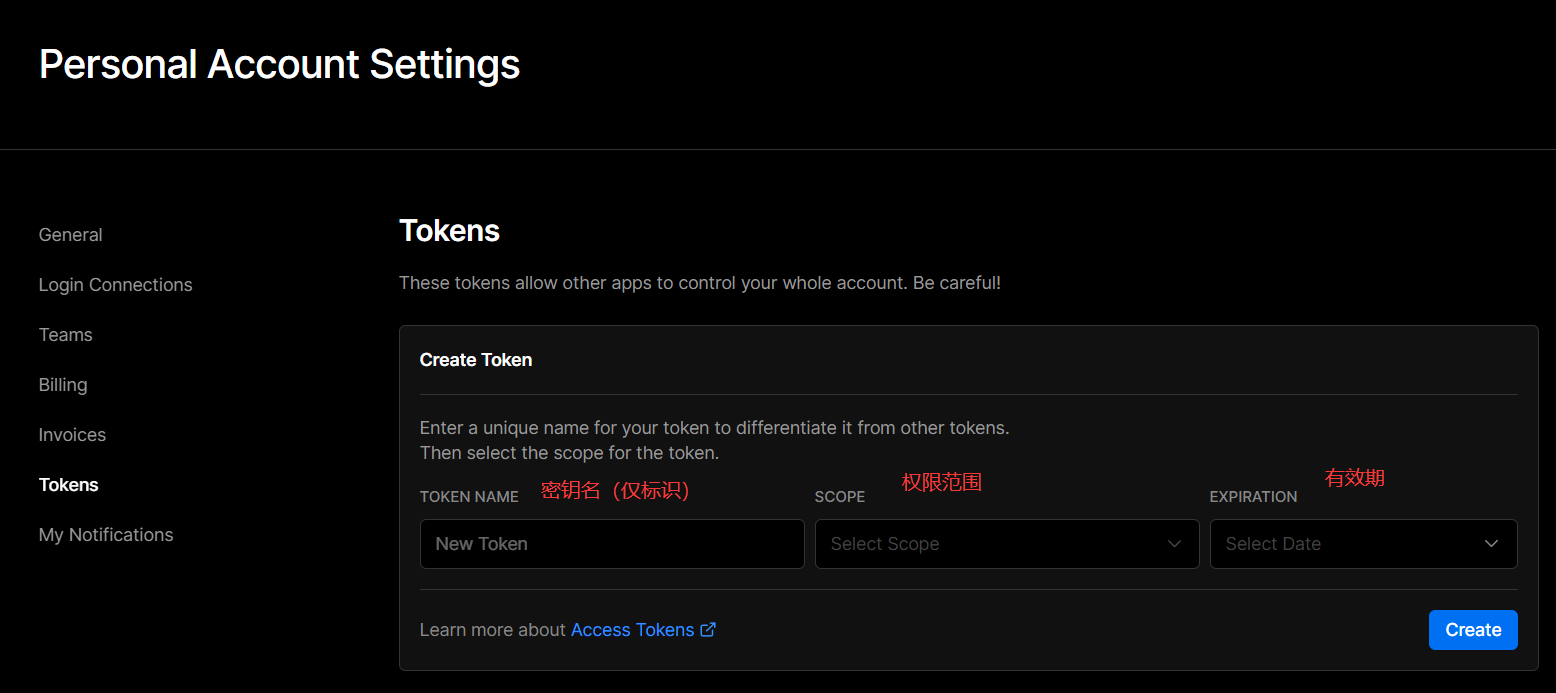
Get VERCEL_ORG_ID and VERCEL_PROJECT_ID
Install the Vercel CLI locally and log in:
# npm
npm i -g vercel
# yarn
yarn global add vercel
Then run vercel link in the blog root directory. This links the local directory to a Vercel project and creates a .vercel folder. Inside .vercel/project.json, you can find VERCEL_ORG_ID and VERCEL_PROJECT_ID.
Add secrets in the GitHub repository
In the GitHub repository, go to Settings -> Secrets and Variables -> Actions, then add:
VERCEL_TOKENVERCEL_ORG_IDVERCEL_PROJECT_ID
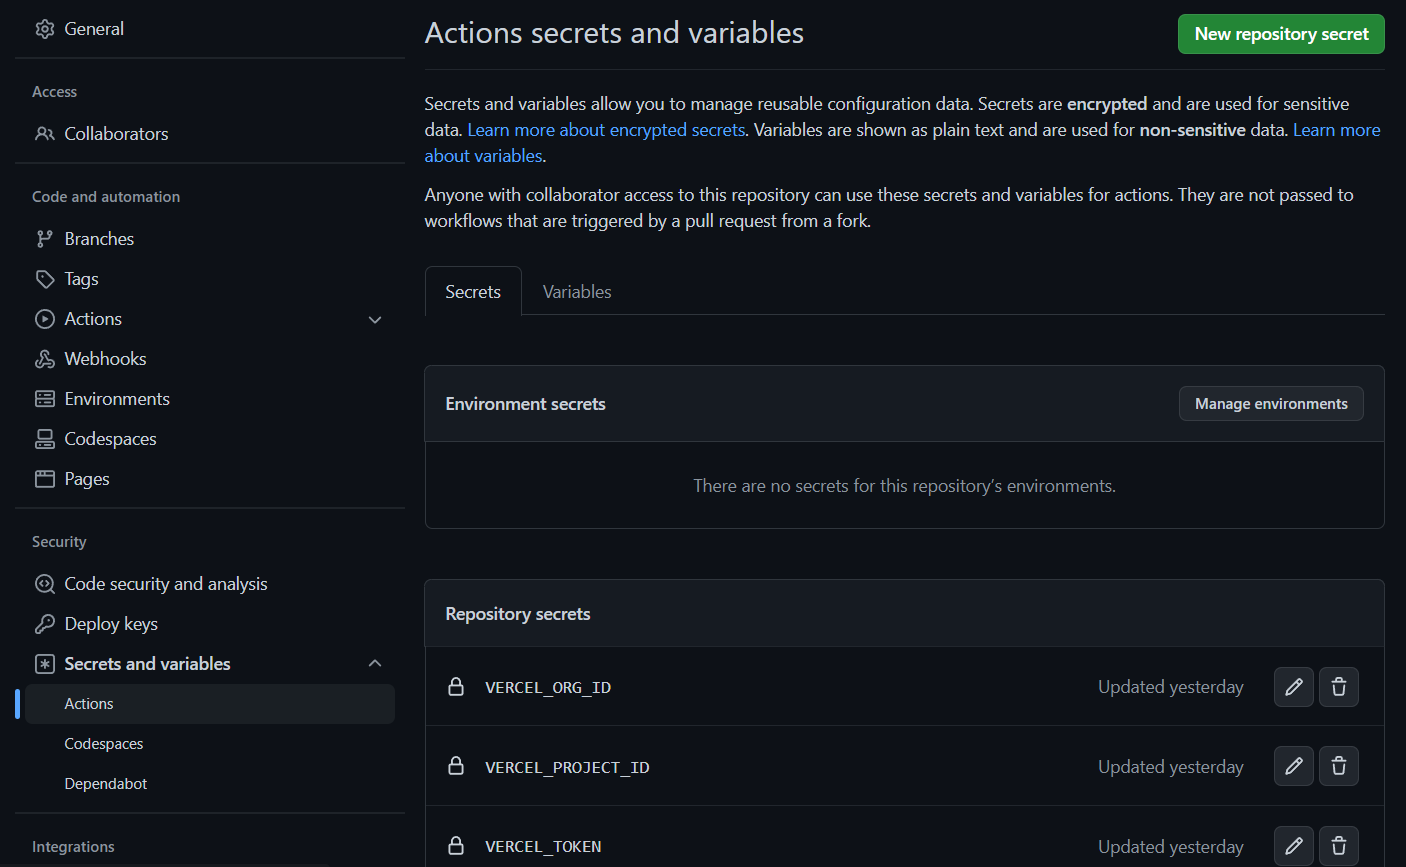
Create the GitHub Actions workflow
Create .github/workflows/deploy.yml in the GitHub repository:
name: Deploy Blog to Vercel Production Deployment

env:
  VERCEL_ORG_ID: ${{ secrets.VERCEL_ORG_ID }}
  VERCEL_PROJECT_ID: ${{ secrets.VERCEL_PROJECT_ID }}

on:
  push:
    branches:
      - main

jobs:
  build-and-deploy:
    runs-on: ubuntu-latest
    steps:
      - uses: actions/checkout@v2
        with:
          persist-credentials: false
          # 0 indicates all history for all branches and tags.
          fetch-depth: 0
      - name: Restore file modification time 🕒
        run: find source/_posts -name '*.md' | while read file; do touch -d "$(git log -1 --format="@%ct" "$file")" "$file"; done
        # run: "git ls-files -z | while read -d '' path; do touch -d \"$(git log -1 --format=\"@%ct\" \"$path\")\" \"$path\"; done"
      - name: Install Vercel-cli🔧
        run: npm install --global vercel@latest
      - name: Pull Vercel Environment Information
        run: vercel pull --yes --environment=production --token=${{ secrets.VERCEL_TOKEN }}
      - name: Build Project Artifacts
        run: vercel build --prod --token=${{ secrets.VERCEL_TOKEN }}
      - name: Deploy Project Artifacts to Vercel
        run: vercel deploy --prebuilt --prod --token=${{ secrets.VERCEL_TOKEN }}
One detail is especially important: when using actions/checkout@v2, set fetch-depth: 0. The default value is 1, which fetches only a shallow history. The timestamp restoration depends on Git history, so the workflow needs the full history for branches and tags.
After committing and pushing these changes, git push will trigger the GitHub Action, and the Action will deploy the blog to Vercel.
Deploying to GitHub Pages with the same approach
If the Hexo source files are hosted on GitHub and the site is deployed to GitHub Pages through GitHub Actions, the same timestamp restoration step can be added before the build step:
- name: Restore file modification time 🕒
  run: find source/_posts -name '*.md' | while read file; do touch -d "$(git log -1 --format="@%ct" "$file")" "$file"; done
The rest of the workflow depends on the deployment method. The important part is still the same: check out enough Git history, restore Markdown modification times, then build and deploy.
Here is a complete example that builds the Hexo site and deploys the generated files to the gh-pages branch:
name: deploy blog to github

on:
  push:
    branches:
      - main

jobs:
  build-and-deploy:
    runs-on: ubuntu-latest
    steps:
      - name: Checkout 🛎️
        uses: actions/checkout@v2
        with:
          persist-credentials: false
          # 0 indicates all history for all branches and tags.
          fetch-depth: 0
      - name: Restore file modification time
        run: find source -name '*.md' | while read file; do touch -d "$(git log -1 --format="@%ct" "$file")" "$file"; done
      - name: Install and Build 🔧
        run: |
          npm install
          npm run build
      - name: Deploy 🚀
        uses: JamesIves/[email protected]
        with:
          ACCESS_TOKEN: ${{ secrets.DEPLOY_TOKEN }}
          BRANCH: gh-pages # The branch the action should deploy to.
          FOLDER: public # The folder the action should deploy.
          CLEAN: true # Automatically remove deleted files from the deploy branch
Do not forget to add DEPLOY_TOKEN to the repository secrets if this workflow is used.